
Choose the Workflow That Matches the Delivery
| Need | Recommended approach | Reason |
|---|---|---|
| Need to test before burning | Encrypted ISO image | Mount the image and inspect both public and secure areas |
| Need several identical discs | Verified encrypted ISO | Use one approved image as the controlled burn source |
| Need immediate one-off delivery | Direct encrypted disc | Skip the image stage only when the project is already verified |
| Need ordinary unprotected archive | Standard ISO | Do not add password protection when confidentiality is not required |
Prepare the Files, Media, and Access Plan
Confirm the source
Open representative files, remove unintended copies, and keep a verified backup before authoring.
Match capacity and hardware
Check image or project size against compatible media, recorder, and recipient drive support.
Protect the password
Use a long unique credential, retain it securely, and deliver it separately from the disc or ISO.
Plan verification
Test access, structure, and sample files on a separate compatible Windows computer.
Create an Encrypted CD/DVD ISO: 6 Steps
Prepare and classify the source files
Confirm the approved source set, remove temporary copies, and decide which files require protection and which may remain public.
Choose Make ISO Image File
Open Secure Disc Creator and select Make ISO Image File as the recorder target instead of a physical optical drive.
Add secure and optional public content
Use Add Files to place confidential folders under Secure Area and unrestricted instructions under Public Area.
Set the image name and password
Choose a clear disc name, create a long unique password, and record it in an approved secure location.
Create the encrypted ISO
Select a destination with enough free space, start Make Image, and wait for completion without moving source files.
Mount and verify the image
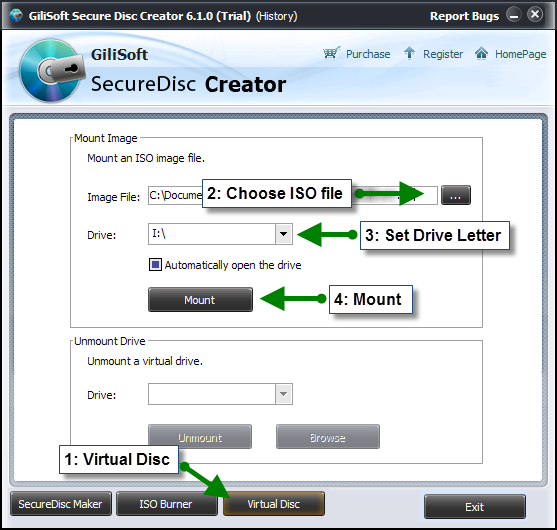
Use Virtual Disc to mount the completed ISO, test the public area, enter the password, and open representative protected files.

Build Verification into the Workflow
Use one approved source set
Do not rebuild repeat copies from changing folders when one verified ISO can act as the production master.
Name images clearly
Include purpose or revision in the filename without exposing confidential details.
Protect the ISO itself
Store the image in controlled local storage even though its secure area is password protected.
Verify before retention
An image that was created successfully may still contain the wrong files or access layout.
Use GiliSoft Secure Disc Creator for the Protected Workflow
Secure Disc Creator can create an encrypted ISO with secure and public areas, mount it in a virtual drive, and later burn the verified image to CD or DVD. This staged workflow reduces wasted media and makes repeat production more consistent.
- Create password-protected CD, DVD, and ISO projects on Windows.
- Separate public files from secure files when the delivery needs both access levels.
- Mount encrypted images for validation and burn approved ISOs to compatible media.
Troubleshooting
- Make Image is unavailable: select Make ISO Image File as the target and add at least one valid file.
- The destination lacks space: choose another local drive with capacity above the estimated image size.
- The image contains the wrong files: rebuild it from the approved source and review Secure/Public placement.
- The ISO will not mount: confirm creation completed and that the file was not moved, truncated, or corrupted.
- The password fails after mounting: check keyboard layout and test the exact password recorded at creation.
- Repeat discs differ: burn every copy from the same verified ISO and document its filename or checksum.
Protect the Password and the Production Source
Optical media can be lost, copied, damaged, or delivered to the wrong person. Encrypt only authorized content, keep a backup before authoring, store passwords or recovery information in an approved location, transmit credentials separately, and preserve the verified ISO or source files under appropriate access control.
Frequently Asked Questions
What is an encrypted CD/DVD image?
It is an ISO image prepared with password-protected content and, optionally, a separate public area.
Why create an ISO before burning?
It allows testing, archival, and repeatable disc production without using blank media for every revision.
Can I open the image without burning it?
Yes. Mount it in the Secure Disc Creator virtual drive and test it as a virtual disc.
Can I include public files in the image?
Yes. Place unrestricted files in Public Area and confidential files in Secure Area.
Does the ISO filename need to contain the password?
No. Never place the password in the filename or beside the image in an unprotected text file.
Can I burn multiple discs from one image?
Yes. Use the verified ISO as the controlled source for repeat copies.