
Create an Encrypted ISO for Archive and Delivery
An ISO is a disc image, not automatically an encrypted archive. Build the protected project first, then keep the approved image and its password handling under control until the final delivery.
Quick answer
Select Make ISO Image File in GiliSoft Secure Disc Creator, put private content in the secure area, set its password, save the image, then mount and test it before archiving or burning.
Choose the Right Disc Workflow
Use an ISO when the exact disc layout needs approval, repeatable burning, or an offsite archive. Use direct burning when one disc is needed now and there is no separate review stage.
| Output | Best use | Validation |
|---|---|---|
| Protected CD or DVD | Physical offline handoff | Reinsert and read-test on a recipient-like PC |
| Encrypted ISO image | Review, archive, or later burning | Mount and test public and secure areas |
| Approved ISO burned to disc | Repeatable copies of one reviewed release | Test the actual burned media as well as the ISO |
ISO-first release: Step-by-Step
- Define what the archive contains
Separate public instructions from confidential content. Remove temporary exports and record the approved version and owner.
- Make the protected image
Choose Make ISO Image File in GiliSoft Secure Disc Creator, add public and secure files, set the password, and save the completed image to a controlled location.
- Mount and inspect
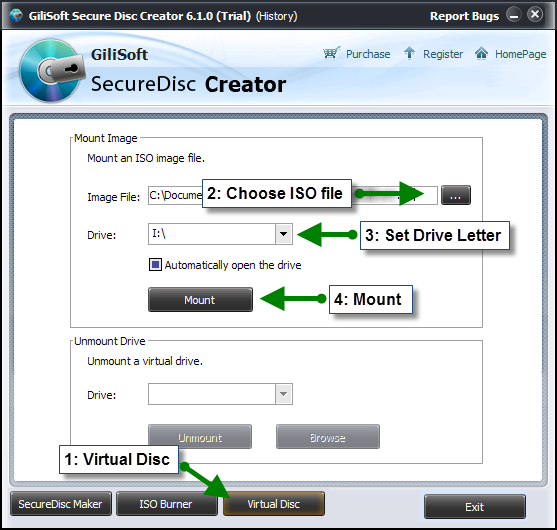
Use the product virtual-drive workflow to mount the image. Check the file list, read the public files, and confirm that the secure area asks for its password.
- Archive or burn the approved copy
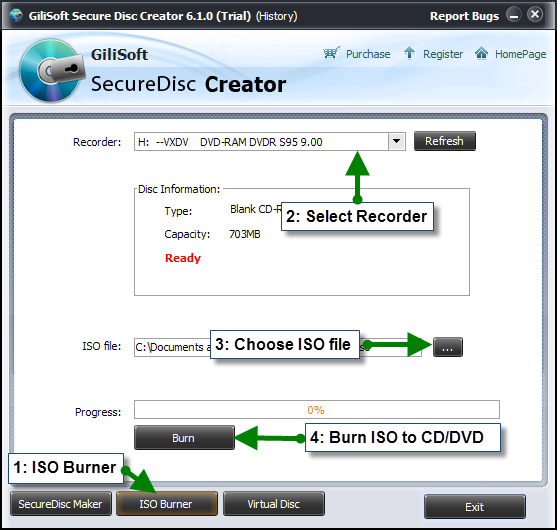
Keep an integrity-checked copy under your retention rules. If physical delivery is required, burn that approved image and read-test the disc, not a different working file.
See the full Secure Disc Creator user guide for the product's controls and the complete disc or ISO workflow.
GiliSoft Secure Disc Creator Interface
These product screenshots show the actual file-area, password, burn, image, or recipient controls used in this workflow.

Verify Before Distribution
- Confirm the final file list, version, and media capacity.
- Open public files without a password and protected files only after entering it.
- Test the intended Windows computer, optical drive, and recipient instructions.
- Record the publisher copy and give the password through a separate channel.
Frequently Asked Questions
Is every ISO encrypted?
No. A normal ISO can expose its files when mounted. This workflow creates an image with a password-protected secure area.
Can I inspect the image without burning a disc?
Yes. The product guide shows mounting the completed image in a virtual drive and checking both areas before burning.