
Best Screen Recording Software for Windows
A useful screen video starts before the Record button. Define the viewer outcome, prepare a clean capture state, test screen and sound, and leave enough time to review the final file at its real delivery size.
Quick answer
Choose software by capture reliability, audio control, webcam support, editing needs, and output verification rather than by the longest feature list. Use GiliSoft Screen Recorder Pro when the job needs both dependable capture and practical post-recording tools in one Windows workspace.
Evaluate the Complete Recording Workflow
| Decision | What to prepare | Quality check |
|---|---|---|
| Capture | Full screen, region, app window, webcam | Keep the viewer goal visible throughout. |
| Audio | System sound, microphone, levels, and sync | Record only what the audience needs. |
| Finish | Trim, join, annotate, convert, caption, and export | Check it at final playback size. |
| Reliability | Test file, resource use, recovery, and output playback | Verify the exported file, not only the editor preview. |
Prepare Windows Before Recording
- Use a clean demonstration state
Open the correct account, sample files, and starting screen without private data.
- Choose a focused capture area
Prefer an application window or selected region when the full desktop adds no value.
- Check Windows permissions
Allow desktop apps to use the microphone and camera when narration or webcam is required.
- Silence interruptions
Turn on Do Not Disturb and close email, chat, password managers, and unrelated tabs.
- Record a short test
Check image sharpness, sound levels, webcam framing, cursor visibility, and the output folder.
Record a Windows screen recorder with GiliSoft Screen Recorder Pro
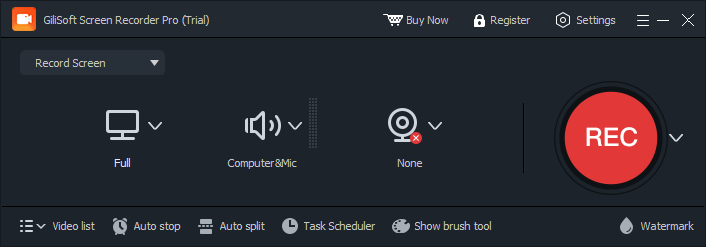
The screenshot below is a real Screen Recorder Pro interface connected to this workflow.
- Define the real job
List the screen, audio, webcam, duration, editing, and delivery requirements.
- Record the same test
Capture a short application workflow with system sound and microphone.
- Inspect the output
Check sharpness, frame pacing, audio sync, cursor visibility, and file size.
- Test finishing tools
Trim a mistake, add a label, and export to the required format.
- Choose by repeatability
Prefer the workflow your team can reproduce and verify consistently.
Finish the Recording Without Over-Editing It
- Keep the original capture
Work from a copy before making major edits or format changes.
- Trim setup and mistakes
Remove countdowns, long pauses, failed clicks, repeated lines, and the stop action.
- Add focused guidance
Use text, zoom, cursor effects, or annotations only where the viewer may lose the path.
- Add captions and structure
Use clear section breaks, captions, or a transcript for longer instructional material.
- Export for the destination
Choose practical dimensions, H.264 video when supported, and a tested audio level.
Review the Exported Video Before Publishing
- Watch from beginning to end
Look for blank frames, cropped controls, private information, pauses, and incorrect steps.
- Listen on headphones and speakers
Check narration clarity, system sound, noise, clipping, and synchronization.
- Test the real destination
Play the exported file in the LMS, help center, browser, presentation, or sharing platform.
- Check accessibility
Review captions, transcript, contrast, text size, speaking pace, and keyboard alternatives.
- Confirm product accuracy
Verify interface labels, version, availability, prerequisites, limitations, and the final link.
Protect People, Accounts, and Private Information
Record only content you are authorized to capture. Obtain required consent before recording students, customers, employees, meetings, or private conversations. Recording and consent rules vary by location and organization.
Use demonstration data and inspect the final video for names, email, chat, notifications, browser history, bookmarks, API keys, passwords, account IDs, internal URLs, and hidden desktop content before publishing.
Best Screen Recording Software for Windows FAQ
Can GiliSoft Screen Recorder Pro record a Windows screen recorder?
Yes. Choose the full screen, a selected region, or an application window, then enable system audio, microphone, and webcam only as the project requires. Make a short test first.
Why is the microphone or webcam unavailable?
In Windows Privacy and security settings, allow microphone or camera access and allow desktop apps to use the device. Close other applications that may already be using it.
How can I prevent notifications from appearing?
Turn on Windows Do Not Disturb, close private windows, and use application-window or selected-region capture when full-screen recording is unnecessary.
What should I check before publishing?
Review the whole file for crop, private information, cursor visibility, audio quality, synchronization, captions, spelling, playback, and the final call to action.
Can I trim or combine recordings afterward?
Yes. Screen Recorder Pro includes tools for cutting, joining, annotations, overlays, conversion, and export after capture. Keep an original recording before major edits.