

When a file is write-protected, Windows may let you open and copy it but prevent editing, renaming, deleting, or saving changes. A USB flash drive or SD card can show similar behavior when a physical lock, file attribute, system setting, or open application forces read-only access.
Use the methods below in order. Start with the simplest physical and file-level checks before changing Windows system settings.
What Does “File Is Write Protected” Mean?
Write protection means the content can be read but changes are restricted. The source of the restriction matters: a hardware switch affects the storage device, a Read-only attribute applies to a file, Windows policy can affect removable storage, and another program may temporarily hold the file open.
Method 1: Turn Off the USB or SD Card Lock Switch
Some SD cards, adapters, and removable devices have a physical lock switch. If it is in the locked position, Windows cannot override it with a file setting.
Step 1. Safely eject the device from Windows.
Step 2. Inspect the side of the card, adapter, or USB device for a switch marked Lock.
Step 3. Move it to the unlocked position, reconnect the device, and test a small file change.
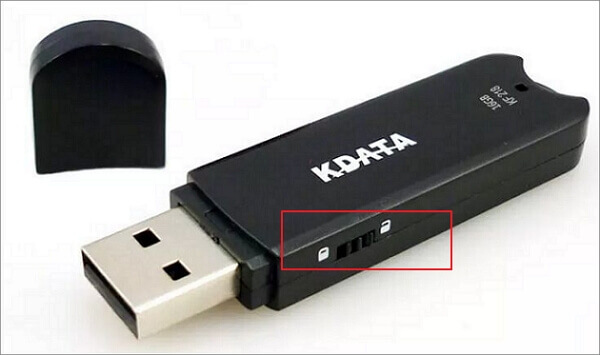 Check the physical switch before changing Windows settings.
Method 2: Remove the File Read-Only Attribute
Use this method when one particular file cannot be edited but other files on the same drive work normally.
Step 1. Open File Explorer and locate the affected file.
Step 2. Right-click the file and choose Properties.
Step 3. On the General tab, clear Read-only.
Step 4. Select Apply, then OK, and try saving the file again.
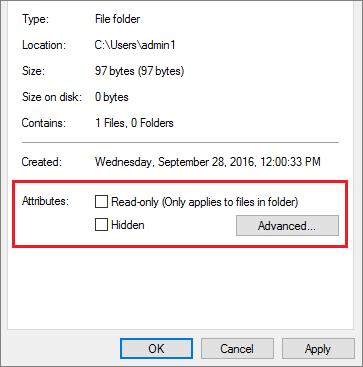 Clear Read-only for an individual file when the restriction is stored in its attributes.
If the option returns immediately, verify that your Windows account has permission to modify the file and that the file is not being synchronized or managed by another application.
Method 3: Check USB and SD Card Write Protection in Windows
If an entire removable drive remains read-only and it has no active hardware lock, a Windows storage policy may be enforcing write protection.
Step 1. Connect the removable drive and sign in with an administrator account.
Step 2. Press Windows + R, enter regedit, and approve the administrator prompt.
Step 3. Go to HKEY_LOCAL_MACHINE\SYSTEM\CurrentControlSet\Control\StorageDevicePolicies.
Step 4. If a WriteProtect DWORD value exists and is set to 1, open it and change the value to 0.
Step 5. Close Registry Editor, restart Windows, reconnect the drive, and test again.
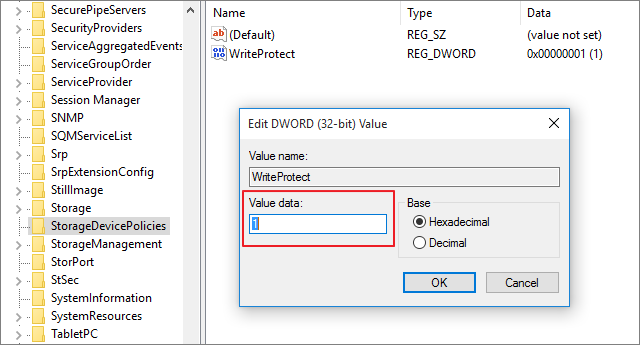 A value of 0 removes this specific Windows removable-storage write-protection setting.
If a company manages the PC, local or domain policy may restore the setting. Contact the administrator rather than repeatedly changing managed security policy.
Method 4: Close Files and Applications
An editor, preview tool, backup program, synchronization client, antivirus scan, or another user session may be holding the file open.
Step 1. Close every program that may be using the file.
Step 2. Pause active synchronization or backup tasks if you control them.
Step 3. Restart Windows and test the file before reopening other applications.
Step 4. If the problem affects only one application, save a copy under a new name to determine whether the original file is locked by that program.
How to Intentionally Protect Files From Changes
Write protection is useful when important documents should remain readable but should not be modified, renamed, moved, or deleted accidentally. GiliSoft File Lock Pro provides a dedicated Protecting File workspace for files, folders, and local drives.
Controlled file protection
Apply a protection rule when the restriction is needed, then select the protected item and use Unprotect when authorized editing should resume.

Step 1. Open File Lock Pro and enter the master password.
Step 2. Under Local Disk, choose Protecting File.
Step 3. Add the file, folder, or drive that should be protected from unwanted changes.
Step 4. Apply the protection and test the item from Windows Explorer.
Step 5. To edit the content later, return to the same workspace, select the item, and choose Unprotect.
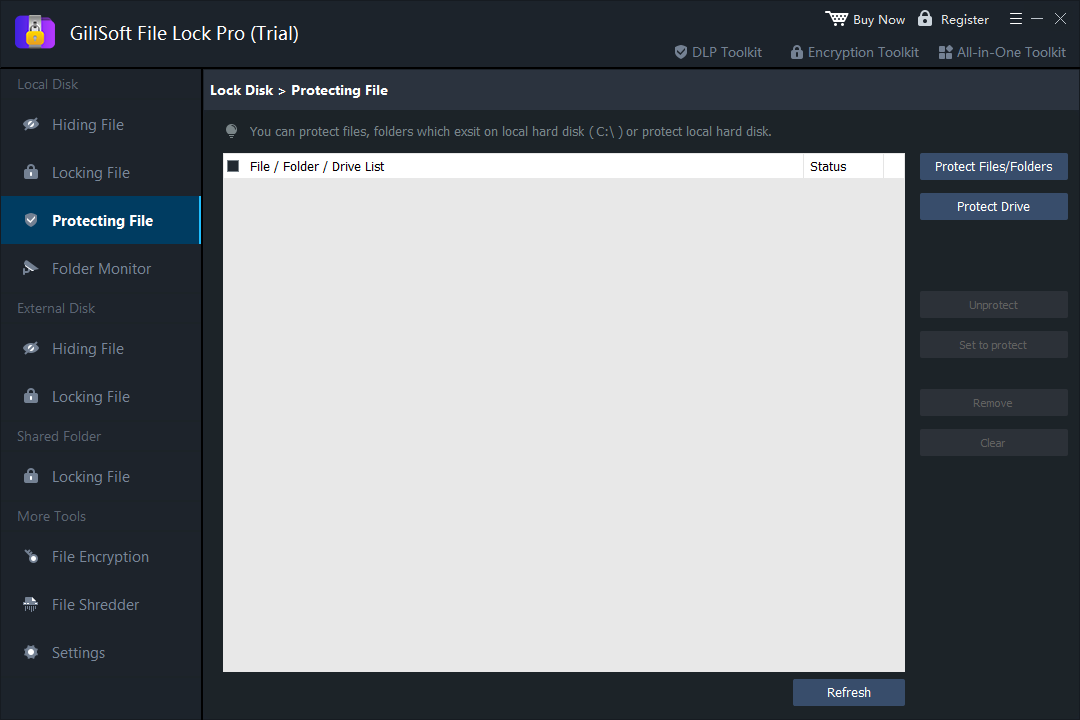 Use one protection list to apply and remove controlled file, folder, or drive protection.
Windows File and Folder Permissions Explained
A write-protection message can also result from account permissions. Windows separates several access levels:
- Read: view and access existing content.
- Write: create or change file content.
- Read & Execute: view content and run executable files.
- List Folder Contents: see files and subfolders inside a folder.
- Modify: read, write, rename, and delete permitted content.
- Full Control: manage content and change permissions.
If the file belongs to another Windows account or a managed company location, obtain the correct permission instead of taking ownership without authorization.
File Write Protection FAQ
Why does Read-only keep returning?
The file may be managed by another application, stored in a location where your account lacks Modify permission, or affected by storage-device policy.
Does clearing Read-only unlock an entire USB drive?
No. A file attribute affects that file. An entire removable drive may be controlled by a physical switch, device state, Windows policy, or hardware failure.
Can File Lock Pro remove its own protection later?
Yes. Open the Protecting File workspace with the authorized master password, select the protected item, and use the available Unprotect action.
Protect important files without making the rule permanent
Use GiliSoft File Lock Pro to apply controlled file protection and remove it later when authorized editing is required.
Download File Lock Pro Trial