

A separate local drive can contain private archives, personal media, financial records, client documents, or project data that should not appear during ordinary Windows browsing. You can hide its drive letter with built-in administration tools or manage drive visibility through GiliSoft File Lock Pro.
The methods are not equivalent. Removing a drive letter or applying Group Policy hides an entry point but does not encrypt the data. File Lock Pro provides password-controlled hiding and a clearer unhide process. Use full-disk encryption when the requirement is protection against offline access.
Before You Hide a Local Disk Drive
- Back up important files before changing drive letters or visibility settings.
- Do not remove the drive letter from the Windows system, boot, recovery, or EFI volume.
- Close applications and services that use the target drive.
- Record the original drive letter so it can be restored later.
- Confirm whether the goal is casual concealment, password-controlled hiding, or encryption.
Which Local Disk Hiding Method Should You Use?
| Method | Best for | What it changes | Important limitation |
|---|---|---|---|
| GiliSoft File Lock Pro | Password-controlled personal privacy | Manages hidden local drives in one interface | Authorized users should keep the master password safe |
| Disk Management | Administrators removing one drive letter | Removes the drive letter or mount path | Does not encrypt the volume |
| Group Policy | Hiding specified drives in File Explorer | Changes Explorer visibility policy | Not available in Windows Home; direct paths may still work |
| DiskPart | Experienced command-line administrators | Removes the selected volume letter | Selecting the wrong volume can disrupt the system |
Method 1. Hide a Local Disk with GiliSoft File Lock Pro
File Lock Pro has a dedicated Local Disk > Hiding File area with a Hide Drive action. This is the simplest option when you want a password-controlled list instead of manually removing and remembering drive letters.
- Open File Lock Pro and enter the master password.
- Choose Local Disk, then select Hiding File.
- Select Hide Drive.
- Choose the separate data drive you want to hide.
- Confirm the drive appears in the management list.
- Open File Explorer and verify that the drive no longer appears during ordinary browsing.
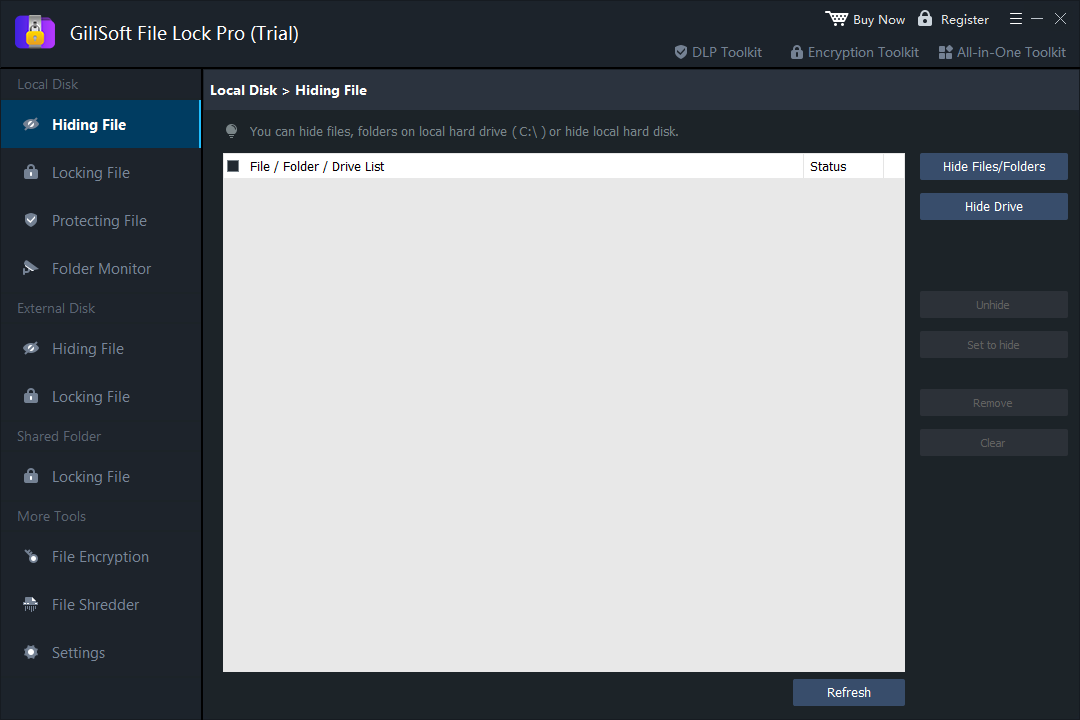 Select Hide Drive from the Local Disk hiding interface.
Hide drives without repartitioning
Use the same application to hide files, folders, and local or external drives, then restore authorized visibility from the managed list.

Method 2. Hide a Local Drive with Disk Management
Disk Management can remove a drive letter from a separate data volume. The volume remains on the disk, but it no longer appears with a letter in ordinary File Explorer views.
- Press Win + X and choose Disk Management.
- Identify the correct data volume by label, capacity, file system, and current drive letter.
- Right-click it and choose Change Drive Letter and Paths.
- Select the drive letter and choose Remove.
- Read the warning carefully, confirm that no application depends on the letter, then select Yes.
- Reopen File Explorer and verify that the drive entry is hidden.
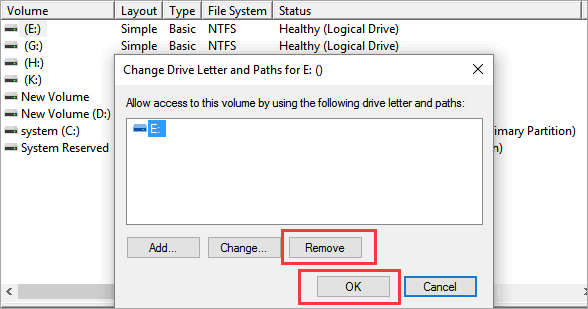 Remove the letter from a verified data volume; do not use this on system or recovery volumes.
Method 3. Hide Specified Drives with Local Group Policy
Windows Pro, Enterprise, and Education editions include a policy named Hide these specified drives in My Computer. Windows Home does not include Local Group Policy Editor by default.
- Press Win + R, enter gpedit.msc, and select OK.
- Go to User Configuration > Administrative Templates > Windows Components > File Explorer.
- Open Hide these specified drives in My Computer.
- Select Enabled.
- Choose the drive combination from the Options list.
- Select Apply, then OK, and sign out or restart Explorer if necessary.
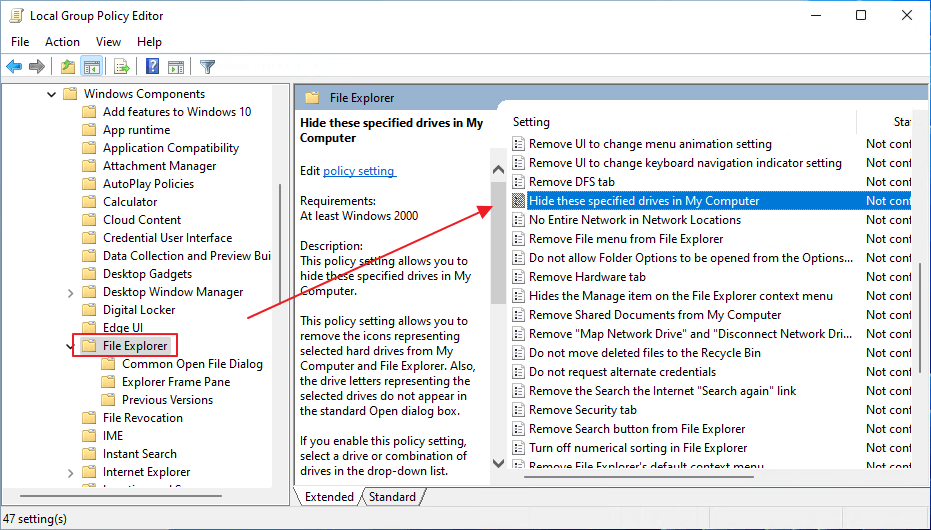 Open the File Explorer policies under the current user configuration.
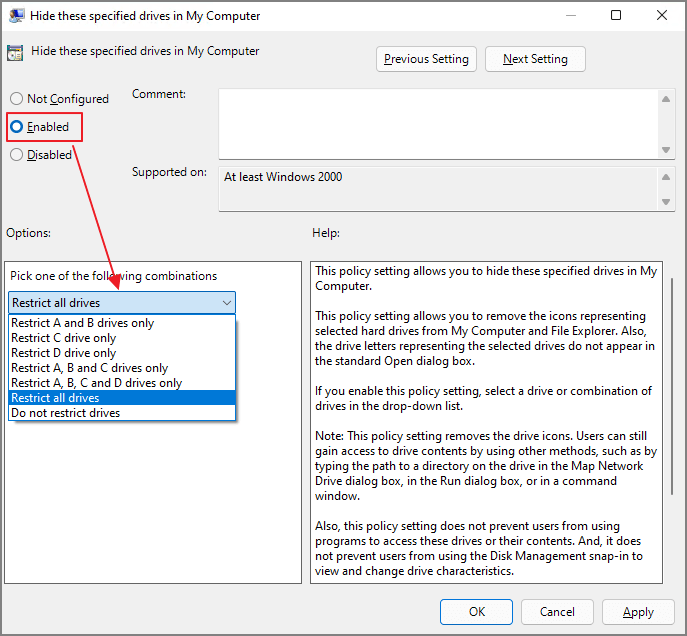 Enable the policy and choose the supported drive combination.
Method 4. Hide a Drive Letter with DiskPart
DiskPart performs the same underlying drive-letter removal from the command line. Use it only when you can positively identify the target volume.
- Search for Command Prompt and choose Run as administrator.
- Enter diskpart.
- Enter list volume and identify the target by label, size, file system, and letter.
- Enter select volume N, replacing N with the verified volume number.
- Enter detail volume and confirm the selection again.
- Enter remove letter=E, replacing E with the verified letter.
- Enter exit.
list volume
select volume N
detail volume
remove letter=E
exit
How to Unhide a Local Disk Drive
Restore a File Lock Pro hidden drive
- Open File Lock Pro and enter the master password.
- Go to Local Disk > Hiding File.
- Select the hidden drive and choose Unhide.
- Verify the drive appears and opens normally in File Explorer.
Restore a drive letter with Disk Management
- Open Disk Management and locate the volume without a drive letter.
- Right-click it and choose Change Drive Letter and Paths.
- Select Add.
- Choose Assign the following drive letter, preferably using the original letter.
- Select OK and verify application paths.
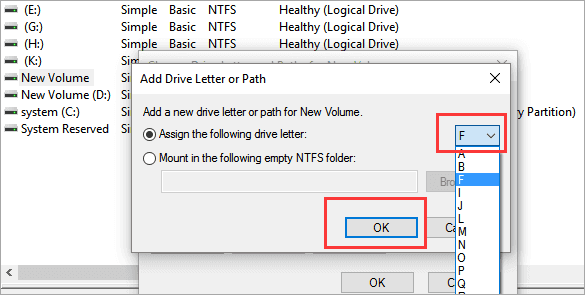 Assign a letter again to restore the volume to normal File Explorer browsing.
Disable the Group Policy setting
Return to Hide these specified drives in My Computer, set it to Not Configured, apply the change, and sign out or restart Explorer.
Restore a letter with DiskPart
After selecting and verifying the correct volume, enter assign letter=E, replacing E with the desired unused drive letter.
Hide Drive vs Lock Drive vs Encrypt Drive
For a Windows 11-specific whole-partition scenario, see How to Hide a Whole Drive Partition on Windows 11. For an encrypted container that mounts as a separate drive, see GiliSoft Private Disk.
Local Drive Hiding Checklist
- Use a separate data volume, not a boot, system, EFI, or recovery volume.
- Record the original drive letter before removing it.
- Close applications and backup jobs that reference the drive.
- Keep a tested method for restoring visibility.
- Use locking or encryption when hiding alone is not sufficient.
- Confirm the drive and its files remain healthy after restoration.
Hide Local Drives with Password-Controlled Management
Use GiliSoft File Lock Pro to hide selected files, folders, and data drives without manually changing partition structure.
Download File Lock Pro Trial