
Password Protect a Flash Drive on Windows 8
Back up the flash drive, create a password-protected private area, and test access on the Windows 8 computer that will use it. USB security works best when the protection design matches how the drive will be carried, shared, opened, backed up, and recovered.
Quick answer
Back up the flash drive, create a password-protected private area, and test access on the Windows 8 computer that will use it. Back up the drive first, test the password on a second supported Windows PC, and never store the only recovery information on the encrypted device.
Choose the Right USB Protection Model
| Need | Best-fit approach | Tradeoff to verify |
|---|---|---|
| Share some files openly and keep others private | Encrypted private area plus public area | Public files remain readable without a password |
| Encrypt every file on the removable drive | Whole-drive removable-media encryption | Compatibility, Windows edition, and recovery-key handling |
| Send a few protected files independently | Encrypted file or package | Recipient software and password-delivery method |
| Block USB devices on managed computers | USB device-control policy | This controls device use, not the data already stored on it |
Prepare the USB Drive Safely
- Identify the correct device.
Confirm the model, capacity, drive letter, and contents so another removable disk is not changed by mistake.
- Make a separate backup.
Copy all important files to protected storage and open representative files from that backup.
- Remove unnecessary data.
Do not carry old exports, temporary copies, passwords, or unrelated personal and work files.
- Plan public and private capacity.
Estimate future growth instead of allocating only enough encrypted space for today.
- Choose a recoverable password process.
Use a unique passphrase and store the recovery record somewhere separate from the USB drive.
Create and verify the secure area with GiliSoft USB Encryption
The screenshot below is the real product interface for this workflow. Use a noncritical USB drive or a complete backup while evaluating the settings.
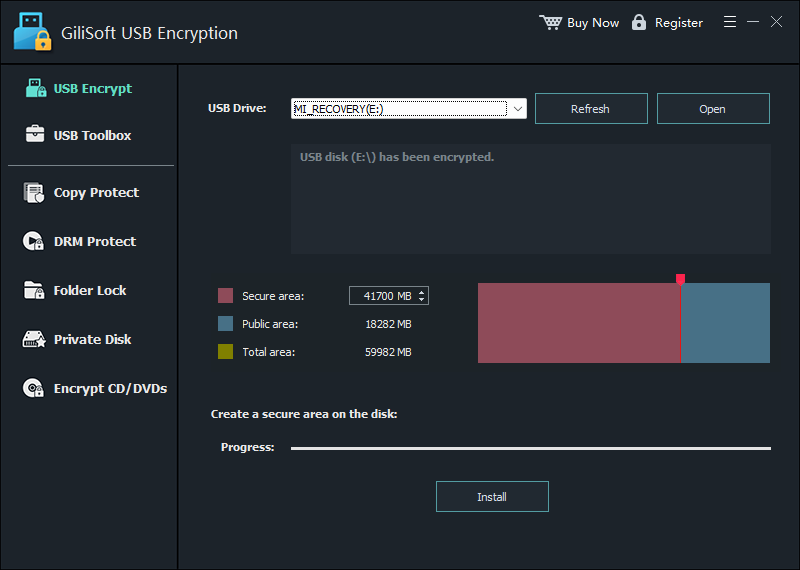
- Back up the USB drive.
Copy important files elsewhere and open representative backup files before repartitioning storage.
- Select the correct device.
Connect the USB drive, open GiliSoft USB Encryption, and use Refresh if the drive is not shown.
- Set the secure-area size.
Reserve enough encrypted capacity for confidential data and leave only the public space the workflow needs.
- Create the secure area.
Click Install and let the operation finish without unplugging the device.
- Open and test it.
Enter the password, mount the private area as a virtual drive, and verify files before relying on it.
Apply the Workflow to This Situation
Back up the flash drive, create a password-protected private area, and test access on the Windows 8 computer that will use it.
Before handing over or travelling with the device, close the secure area and reconnect the USB drive. Inspect the public area as though you were the recipient. If the intended file is missing or a private file is visible, correct the layout before the drive leaves your control.
Verify Before You Rely on the Drive
- Close the private area.
Close open files and applications, then close the mounted encrypted drive.
- Safely remove and reconnect.
Use Windows safe removal, reconnect the device, and confirm only intended public files are visible.
- Open the private area again.
Enter the password and mount it to an available virtual drive letter.
- Check representative files.
Open files from the beginning, middle, and end of the protected set and confirm recent changes were saved.
- Test another supported PC.
Verify the opener and access workflow on a second Windows computer before travel or delivery.
Understand Encryption, Recovery, and Device Risk
Removable-drive encryption protects data at rest, but it does not prevent physical loss, media failure, malicious USB firmware, malware on a host computer, or copying after the encrypted area is opened. Keep Windows and security software current, avoid unknown computers, and scan transferred files according to your organization’s policy.
Microsoft describes BitLocker To Go as whole-drive encryption for removable data drives. GiliSoft USB Encryption instead emphasizes a password-protected private area alongside public storage. Choose between them according to whether public files must remain accessible and how recovery will be managed.
Password Protect a Flash Drive on Windows 8 FAQ
Can one USB drive contain both public and private files?
Yes. GiliSoft USB Encryption creates a password-protected private area while the remaining public area can hold ordinary files. Plan the capacity before creating the secure area.
Does encryption protect files after the private area is opened?
Encryption protects data at rest. After the password is entered and the area is mounted, files can be read by the current computer and may be exposed to malware, monitoring, copying, or accidental changes.
What happens if the USB drive is lost?
Files in the closed encrypted area should remain unavailable without the password, while anything left in public storage remains readable. Physical loss can still destroy access to your only copy, so maintain a separate backup.
Is USB Encryption the same as USB Lock?
No. USB Encryption protects a private storage area on a removable drive. USB Lock controls whether selected USB devices or USB network adapters may be used on a Windows PC.
Can I unplug the drive while the private area is open?
Close documents, close the mounted secure area, and use Windows safe removal first. Disconnecting during writes can corrupt files or the storage device.
Where should I keep the password or recovery information?
Keep it in a separate trusted password or recovery system, never as a plaintext note on the same USB drive.