Create a password-protected private area on your USB drive. Keep confidential documents, photos, and videos private while leaving public files available for everyday sharing.
Create encrypted and public areas on the same USB drive
Open private files through a password-protected virtual drive
Use read-only access, backup, and opener recovery tools
Choose the task you need: create or open a private USB area, store files, use read-only mode, change the password, back up data, or restore the opener. Each task has its own controls and steps.
What Would You Like to Do?
Create the Private Area and Leave Public Space
Use this workflow for initial setup or a deliberate rebuild after verified backups. For an existing encrypted drive, go directly to Open the Private Area.
1Back up the USB drive before setup
Identify the intended USB device and make a separate backup of its important files. Open representative files from that backup to verify them before creating or changing an encrypted layout.
2Select the intended USB device
Connect the USB drive and open GiliSoft USB Encryption > USB Encrypt. Select the device in USB Drive, using Refresh if needed. Check its label, drive letter, capacity, and files before proceeding.
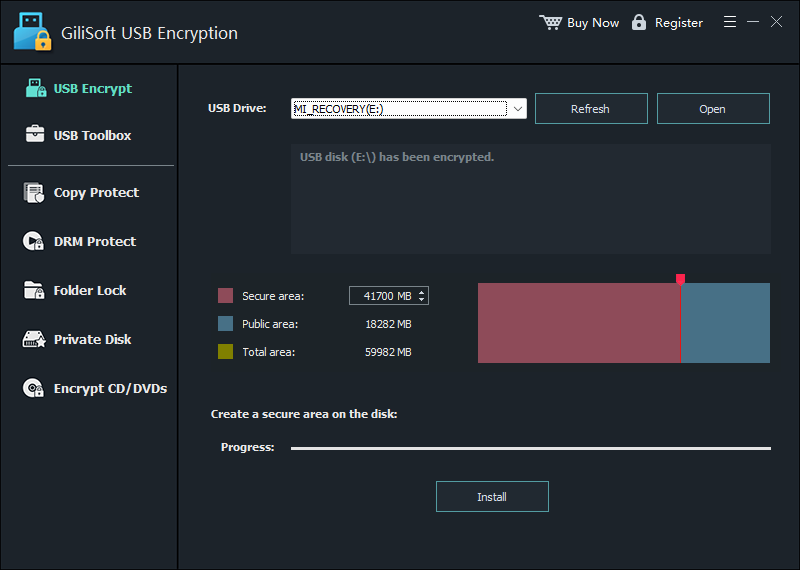
USB Encrypt shows the selected drive and private/public capacity controls. The example device shown is already encrypted.
3Choose the private and public capacity
Set Secure area with the size control or slider, then review the remaining Public area. Leave enough private capacity for future files. The screenshot values are an example, not required sizes.
Capacity example: the screenshot shows 59,982 MB total, 41,700 MB secure area, and 18,282 MB public area. Its example device is already encrypted; the image illustrates the controls, not a second installation to perform on that drive.
4Create the private area and retain its password
Select Install, complete the password setup requested by the program, and wait for creation to finish without disconnecting the drive. Keep the password available for the first opening test. If the device already has a secure area, use Open instead of repeating installation.
Know Which Files Are Private and Which Are Public
Public area
The ordinary part of the USB drive holds files you are happy to share without the private-area password, such as handouts, installers, or general documents.
The opener file, agent.exe, provides access to the private area. Its presence in public storage does not make the private files public.
Private or secure area
This is the encrypted space for confidential files. After password verification, it opens as a separate virtual drive letter in Windows.
Store files inside that mounted drive to protect them. Creating a private area does not automatically move every existing public file into it.
Before creating or changing the layout: identify the correct device and make a separate, verified backup of all important files. Keep the password somewhere other than a plain-text note on the same USB drive.
Open, Use, and Close the Private Area
Open an Existing Private Area
Launch the opener for the existing area
Select the encrypted device in USB Encrypt and choose Open, or run its agent.exe opener on the Windows PC where it will be used.
Enter the password and choose a free drive letter
Enter the private-area password and choose an available Drive Letter. This is the virtual private drive, separate from the public USB drive.
Open the virtual drive and check the contents
Select Open in virtual drive and verify the mounted area. The public E: and private D: letters in the screenshots are examples, not fixed requirements.
Enter the private-area password, choose an available virtual drive letter, and optionally enable read-only mode.
Test the opener and password on the intended Windows PC before travel or handoff. If the opener is missing, use the Recover workflow for the existing area.
Store Files in the Private Virtual Drive
Use Browse to locate the mounted private area
After opening with the password, select Browse. Check the private virtual drive letter before copying files.
Copy in the files that need protection
Put the intended documents, photos, videos, folders, or archives inside that virtual drive. Files left in public USB storage are not moved into private storage automatically.
Verify the saved copies and review public files
Open representative files from the virtual drive and confirm the transfer completed. Keep verified backups, and review any ordinary copies still on the desktop or public USB area before sharing. Then close the private session.
Browse opens the mounted private drive. Close ends the secure session after you have saved and closed files.
Close the Private Area and Eject Safely
Save and close files using the private drive
Finish document edits and close applications and Explorer windows using the mounted private area. Wait for copying or other writes to finish.
Use Close in the opener
Select Close in the opened-area window. The opened-area screenshot shows Browse and Close. This ends the mounted session; it is not the Toolbox Uninstall operation.
Eject and verify when needed
Use Windows safe removal before disconnecting the USB device. On reconnection, test that public files remain available as intended and private access requires the normal password-opening workflow.
Open the Private Area Read-Only
Return to the password-opening window
If the private area is already mounted, save your work and close it. Open the existing area again and enter its password.
Select the read-only checkbox before opening
Choose Open secure area as read-only mode, select an available virtual drive letter, and open the area. The password-window screenshot shows the checkbox.
Check viewing and editing behavior
Open a sample file and confirm changes cannot be saved back to the mounted private area. To edit later, close it and reopen without read-only mode. Readable content can still be copied elsewhere; this setting is not document copy protection.
Manage Passwords and the USB Opener
Open USB Toolbox and select the correct encrypted USB drive before choosing an action. Password, Recover, Backup, and Uninstall perform different tasks.
USB Toolbox provides Password, Uninstall, Recover, and Backup actions; Recover restores the agent.exe opener.
Change the Secure-Area Password
Select the existing encrypted device
Open USB Toolbox, select the intended device in USB Drive, and check its identity. Keep the current private-area password available.
Choose Password and complete the change
Select Password and follow the password-change dialog in the installed program. Review the old and new credentials carefully; Recover is not a substitute for knowing the password.
Test the updated password
After completing the change, close any private session and reopen the area with the new password. Verify access to representative files and retain the updated credential separately from the USB drive.
Restore a Missing agent.exe Opener
Preserve the existing private area
If agent.exe is missing, keep the encrypted drive intact. Do not recreate, uninstall, or format the area merely to restore its opener.
Use Recover for the selected USB device
Open USB Toolbox, select the existing encrypted drive, and choose Recover. The on-screen toolbox explanation identifies this action as restoring agent.exe.
Open the existing area with its password
Run the restored opener or choose Open in the main program. Enter the existing private-area password and verify the files. Recover restores the opener, not a forgotten password or arbitrary damaged files.
Keep Filesystem Tools Separate from Opener Recovery
The toolbox also shows Convert to NTFS and Format to NTFS. Review the installed control state and make verified backups before a filesystem change. Formatting erases data; neither action is a way to reset a password or repair a missing opener.
Back Up or Reconfigure the Secure Area
Back Up the Drive and Private Files
Open and copy the private files you need
Open the private area with its password. Copy important files to separate protected storage, and preserve required public files as well. Open representative backup files to verify their contents.
Use the Toolbox Backup workflow when needed
Select the intended encrypted device in USB Toolbox and choose Backup. Follow the destination and completion choices offered by the installed program; keep the result on separate storage.
Keep file-level verification and backup records
Retain the verified file copies and any backup output until the next task has been checked. A copy of public storage alone is not a readable backup of private files, and Toolbox Recover restores the opener rather than those backup contents.
Change the Private/Public Capacity Plan
Make and verify separate backups
Preserve both private and public files on other storage before replacing a layout. If the private area cannot be opened, stop and resolve access before attempting a rebuild.
Rebuild deliberately with the new capacity split
After verifying the backups, remove the old secure area only when replacement is intended. Use Uninstall, then follow initial setup with the new capacity plan. Do not assume the creation slider resizes an existing encrypted area in place.
Copy back and test both areas
Reopen the new private area and copy private files into its virtual drive. Restore intended public files to public storage. Verify representative contents and a close/reopen cycle before discarding backups.
Remove an Existing Secure Area
Copy out everything you need first
Open the private area and preserve required files on separate protected storage. Back up public files too, and verify the copies by opening them.
Select the correct device and choose Uninstall
Finish private-file work, open USB Toolbox, and select the intended encrypted USB device. Use Uninstall only when you intend to delete its secure area and complete the program prompts.
Check the resulting drive state
Wait for completion and inspect the drive before reusing or rebuilding it. Retain the verified backups. For everyday password locking, use Close instead of Uninstall.
Check Access Before Sharing the USB
Close the secure area, safely eject and reconnect the USB drive, check the public files without opening the private area, then enter the password and confirm your protected files are intact.
Test the closed-drive state
Close the private area, eject safely, and reconnect. Check which files remain available in public storage without opening the private area.
Open the private area and check saved content
Enter the correct password, choose a free virtual drive letter, and open representative files. Confirm recent changes and any intended read-only behavior.
Verify the intended PC and backups
Check the normal opening workflow on the Windows PC where the drive will be used and open representative backup files from separate storage.
Check
Expected result
Public storage after reconnection
Only files you deliberately left public are readable without opening the secure area.
Private area while closed
Private files are not available through an open mounted private drive.
Password and virtual drive
The correct password opens the area under the selected available drive letter.
Private file contents
Representative files open correctly, including recent changes you saved before closing.
Read-only mode
Files can be viewed, but changes cannot be saved back to the private area in that session.
Backup and destination PC
Important backup files open correctly, and the normal password workflow works on the Windows PC where the drive will be used.
Troubleshooting the Private USB Area
What you see
What to check next
The USB drive is not listed
Confirm Windows detects the device and check its connection, then use Refresh. Do not format it just to make it appear in the program.
The password is accepted but the expected files are missing
Use Browse or check the selected virtual drive letter. Confirm the files were stored in the private area rather than public storage or another disk.
A chosen virtual drive letter is unavailable
Select another available letter in the opener rather than changing the public USB drive's identity.
Saving files is not allowed
Check read-only mode and available private capacity. Close and reopen in normal mode when editing is intended.
The opener file is missing
Use USB Toolbox > Recover for the existing encrypted drive. Keep the area intact; do not recreate it.
The secure area will not close
Save and close open documents and applications using the virtual drive, then retry Close. Do not unplug during active writes.
The password is forgotten
Recover does not reset it. Preserve the drive and contact GiliSoft Support before changing the encrypted layout.
Frequently Asked Questions
Does creating a secure area encrypt every existing file on the USB drive?
No. The secure area protects files stored inside it. Files left in the public area remain ordinary public files. After creating and opening the private area, copy the files you want to protect into its virtual drive and verify them there.
What kinds of files can I store in the private area?
Documents, photos, videos, audio, folders, archives, and backup files can be stored in the encrypted area. Protection depends on where the files are stored, not on a particular filename extension.
Does read-only mode stop someone from copying files out?
No. Read-only mode prevents changes to the mounted private area; it does not turn readable files into copy-protected documents. A file copied to an ordinary folder outside the private area is a separate copy outside that encrypted storage.
What should I do if agent.exe is missing?
Open GiliSoft USB Encryption, select the existing encrypted USB drive in USB Toolbox, and use Recover to restore its opener file. Then open the existing private area with the correct password. Do not recreate the area or format the drive just because the opener is missing.
Can Recover reset a forgotten secure-area password?
No. Recover restores the USB opener, not the password. Keep the password in a separate password manager or trusted record. If you cannot open the area, preserve the drive and contact GiliSoft Support before attempting changes; password recovery is not guaranteed.
Why does the private area open under a different drive letter?
The public USB drive and the mounted private area are separate Windows drive views. Choose an available letter in the opener. In the screenshots, the public device is E: and the private virtual drive is D:; those letters are examples, not fixed requirements.
Is Uninstall the same as closing the private area?
No. Close ends the mounted secure session. USB Toolbox describes Uninstall as deleting the secure area. Copy out and verify every file you need on separate storage before removing it; do not use Uninstall as a routine way to lock the drive.
Can I increase private capacity after the area is full?
Choose the private/public size when creating the area and leave room for future files. Before changing an existing layout, make and verify separate backups of both private and public files. Do not assume the creation slider can safely resize an existing encrypted area in place.
Is USB Encryption the same as USB Lock?
No. USB Encryption creates a password-protected private storage area on the removable drive. USB Lock controls whether devices may be used on a Windows PC. A device-access rule is not encryption of the files already stored on the drive.
Which license do the purchase buttons in this guide show?
The $49.95 purchase buttons refer to the official checkout option labelled Lifetime / 1 PC / 5 USB sticks. The checkout also lists other plans. Review the current license choices and device limits before completing a purchase.
More USB Encryption Guides
This page is the product workflow guide. Use the focused articles below for a particular drive type or Windows encryption choice.