
Secure Disc Burning Software for Windows
The practical choice is not just which button burns the disc. It is whether the content was approved, where private files are placed, how the password is delivered, and whether the recipient can read the finished media.
Quick answer
GiliSoft Secure Disc Creator can burn a protected data CD/DVD directly or create an encrypted ISO for testing and later burning. In both cases, put open files in the public area, private files in the secure area, and verify the final output.
Choose the Right Disc Workflow
Direct burn is suitable for one approved copy. ISO-first supports review and repeatable copies. Neither path replaces a read test of the finished physical media.
| Output | Best use | Validation |
|---|---|---|
| Protected CD or DVD | Physical offline handoff | Reinsert and read-test on a recipient-like PC |
| Encrypted ISO image | Review, archive, or later burning | Mount and test public and secure areas |
| Approved ISO burned to disc | Repeatable copies of one reviewed release | Test the actual burned media as well as the ISO |
Disc production: Step-by-Step
- Audit the source set
Remove outdated versions and private working files. Calculate the file size against the selected media and confirm the optical drive can write it.
- Choose direct burn or ISO-first
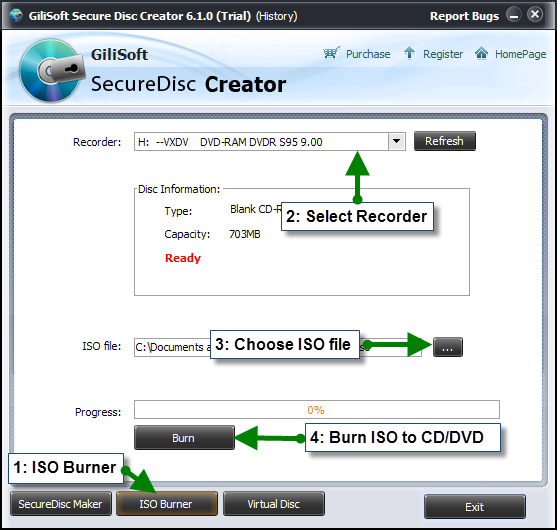
Select the physical burner for immediate delivery, or Make ISO Image File if an approval or archive stage is required.
- Author the secure data layout
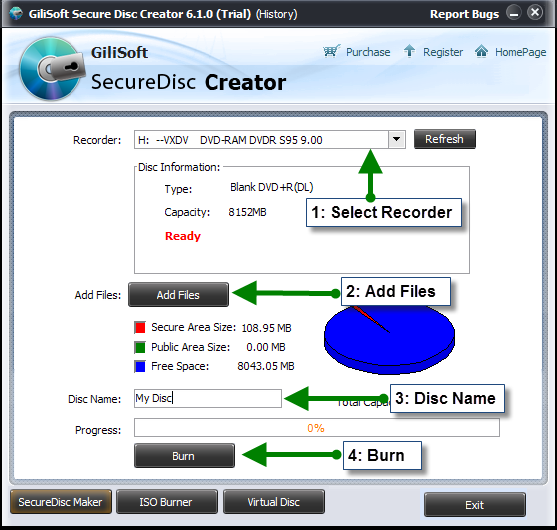
Add public guidance and secure files to their intended areas, set the secure-area password, and start the burn or image creation.
- Read-test the final result
If you created an ISO, mount it before release and then burn the approved image. Reinsert the physical disc and test the public and secure areas on the intended Windows environment.
See the full Secure Disc Creator user guide for the product's controls and the complete disc or ISO workflow.
GiliSoft Secure Disc Creator Interface
These product screenshots show the actual file-area, password, burn, image, or recipient controls used in this workflow.

Verify Before Distribution
- Confirm the final file list, version, and media capacity.
- Open public files without a password and protected files only after entering it.
- Test the intended Windows computer, optical drive, and recipient instructions.
- Record the publisher copy and give the password through a separate channel.
Frequently Asked Questions
Should I burn files directly or create an ISO?
Burn directly for a single approved disc. Use an ISO when the exact image must be reviewed, archived, or reproduced.
Does this make a bootable or video-player disc?
This workflow concerns protected data CDs/DVDs. Do not assume it creates bootable installation media or DVD-Video.