
How to Extract Audio from Video on Windows
Extract audio when you need a standalone soundtrack for listening, editing, transcription, archiving, or authorized reuse. This guide explains the complete GiliSoft workflow, how to select a suitable output format, and what to check when an exported track is silent, too large, or lower in quality than expected.
Quick Answer
Open GiliSoft Audio Converter Ripper, add the video, choose an audio output such as MP3 or WAV, set the output folder, and start conversion. Open the Cut tool before converting when you need only part of the recording, then play the exported file to verify its duration, audio track, and channel output.
Which Audio Format Should You Choose?
The best output depends on what happens after extraction. Avoid converting to a large lossless file when the goal is casual listening, and avoid a low-bitrate MP3 when the audio will be edited again.
| Format | Best for | Practical trade-off |
|---|---|---|
| MP3 | Listening, sharing, LMS uploads, transcripts | Small and widely compatible; it uses lossy compression. |
| WAV | Editing, cleanup, speech analysis, master files | Easy for editors to handle but usually much larger. |
| FLAC | Lossless archives and high-quality music | Smaller than uncompressed WAV while preserving audio data; player support should still be checked. |
| AAC / M4A | Phones, modern players, compact music or speech | Efficient compressed audio; confirm the target app accepts the selected container. |
| WMA / OGG | Specific Windows or open-format workflows | Useful when required by a player or project, but less universal than MP3. |
For a focused MP4-to-MP3 workflow, see the MP4 to MP3 converter guide. For a general audio library, keep the source-quality master and create smaller delivery copies only when needed.
How to Extract Audio from Video with GiliSoft
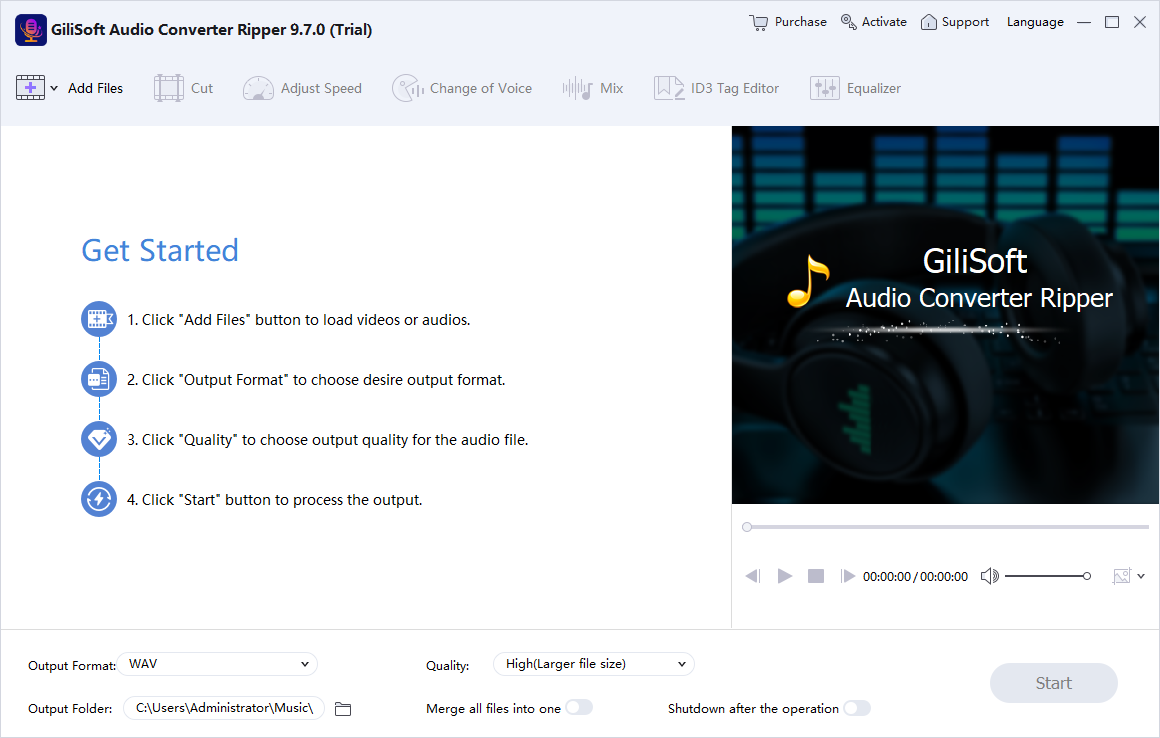 The main workspace accepts audio and video files and provides output format and conversion controls. Click to enlarge.
- Add the source video or a folder
Launch GiliSoft Audio Converter Ripper and add the authorized MP4, MOV, MKV, AVI, WMV, FLV, or other supported media. Add a folder when several lessons, interviews, or recordings need the same output.
- Select the audio output format
Choose MP3 for convenient playback, WAV for further editing, FLAC for a lossless archive, or AAC/M4A when that better matches the destination.
- Check quality, channel, and sample-rate settings
Start with settings close to the source. Avoid raising bitrate or sample rate simply to make the number larger; re-encoding cannot restore detail already missing from the source.
- Cut the section you actually need
Open the Cut tool and set the start time and duration when the useful speech, music, or narration occupies only part of a long video.
- Choose the output folder and convert
Use a separate output folder when processing a batch so the extracted files do not become mixed with the original videos. Start conversion and let the queue finish.
- Play and verify the result
Check the beginning and end, confirm that speech and music are audible in both channels, and compare the duration with the intended video section before deleting or archiving anything.
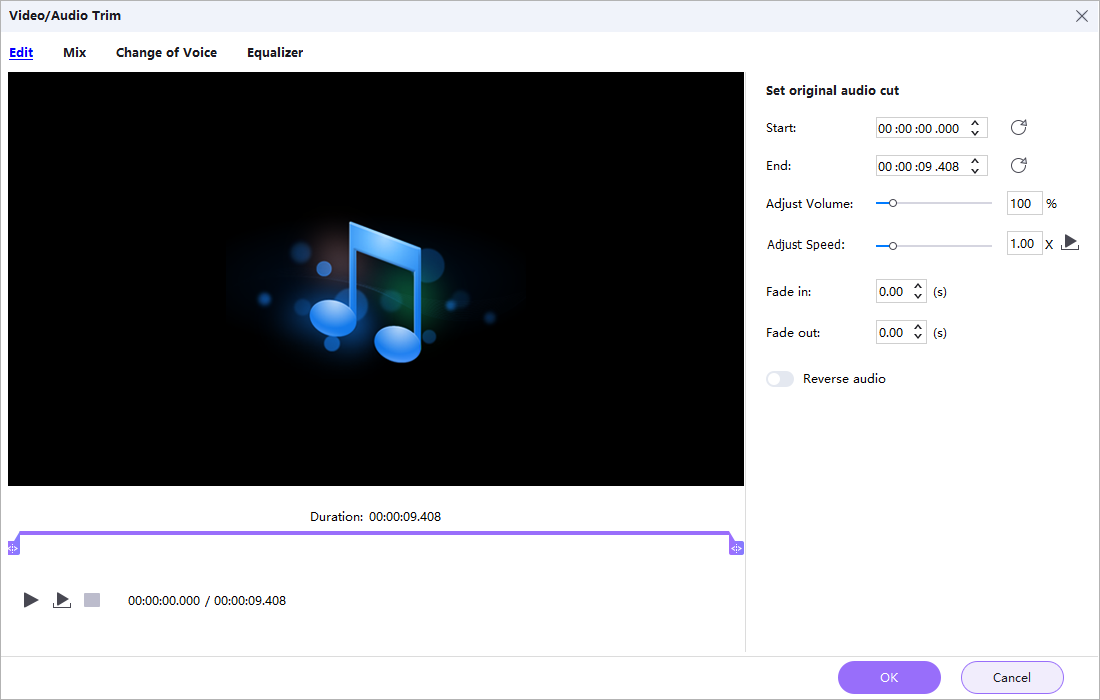 Use the Cut controls to export only the required part of the soundtrack. Click to enlarge.
Audio Quality Settings That Matter
| Setting | What it changes | Useful starting point |
|---|---|---|
| Bitrate | Compressed-audio data per second | Use a moderate setting for speech and a higher setting for complex music; compare a short sample before a large batch. |
| Sample rate | How often audio is sampled | Preserve the source rate when possible. Video sound is commonly associated with 48 kHz, while music libraries often use 44.1 kHz. |
| Channels | Mono, stereo, or another channel layout | Keep stereo for music and spatial information. Mono may be enough for a single-speaker recording if smaller output is important. |
| Volume and effects | Playback level and tonal changes | Export a clean copy first. Apply equalizer, volume, speed, fade, or voice effects only when the project requires them. |
Common Video-to-Audio Workflows
Lecture or webinar to MP3
Make long recordings easier to review on a phone or upload to an LMS. Keep the original video as the visual master.
Interview to WAV
Create an editing-friendly file before noise cleanup, transcription, speaker separation, or detailed cutting.
Authorized soundtrack to FLAC
Preserve the audio without another lossy stage when archiving media you own or have permission to reuse.
Many lesson videos to one format
Add a folder, apply one profile, export to a separate destination, and spot-check several files after the batch completes.
Fix Common Audio Extraction Problems
| Problem | What to check |
|---|---|
| The output is silent | Play the source first, check whether it actually contains audio, verify the selected track, and confirm that volume is not set to zero. |
| The wrong language was exported | The video may contain multiple audio streams. Select the intended track where available, or prepare the stream with a tool that supports explicit track mapping. |
| The file is much larger than expected | WAV and high-rate lossless output can be large. Use MP3 or AAC/M4A for compact listening copies. |
| Speech sounds thin or distorted | Match the source channel layout and sample rate, disable unnecessary effects, and test a short section with a different bitrate. |
| The start or ending is cut off | Add a small lead-in and tail when setting the Cut range, then preview the first and last seconds of the export. |
| A protected source will not open | Use an authorized, locally accessible source file. This guide does not bypass DRM, platform restrictions, or copyright controls. |
When Audio Converter Ripper Is the Right Fit
Save video sound as an audio file
Use Audio Converter Ripper when the final result should be MP3, WAV, FLAC, AAC, M4A, or another standalone audio format.
Extract only the useful section
Open Cut before conversion to remove an unwanted introduction, ending, silence, or unrelated material from the exported track.
Process a group of recordings
Add multiple files or a folder, apply one output profile, and send the results to a separate destination for easier checking.
Continue with audio tools
Use the included cutting, joining, mixing, equalizer, volume, speed, fade, effects, and tag controls when the extracted track needs more work.
Extract Audio from Video FAQ
Can I save audio from MP4 as MP3?
Yes. Add the MP4, choose MP3 as the output, select a destination folder, and convert. The original MP4 remains unchanged.
Can I extract only one part of a video?
Yes. Use the Cut tool before conversion and set the start time and duration for the section you need.
Is WAV always better than MP3?
No. WAV is useful for editing and intermediate work, while MP3 is usually more convenient for listening, uploading, and sharing.
Does extracting audio improve its quality?
No. Conversion can change compatibility, size, and workflow, but it cannot recreate detail absent from the source soundtrack.
Can several videos be processed together?
Yes. Add multiple files or a folder, choose one output profile, and process the queue. Check a sample before starting a very large batch.
Can I edit the extracted audio afterward?
Yes. Audio Converter Ripper includes cutting, joining, mixing, equalizer, volume, speed, fade, effects, and tag tools; a dedicated editor may be better for multitrack production.