Export a finished audio file
Use File > Export or the upper-right Export button. Choose from the settings shown in the export dialog, use a clear file name, and keep the source until the finished result has been checked.

Turn music, voice recordings, interviews, and narration into finished audio. Edit the waveform, combine clips, refine the sound, and export from one Windows audio workspace.
Learn to cut and trim audio, join files, add fades, adjust voice and music, record a new take, and export the result. This guide follows the File, Edit, Effects, and View menus in the waveform editor and the separate tools in the task hub.
Open Audio Editing, load a file, select an unwanted range, and cut it. Add a fade if needed, then Export a new audio file. Choose Joiner for clips that should play one after another; choose Mix or optional Multitrack Beta when sounds should overlap.
The task hub and the waveform editor serve different jobs. Start with a copy of your original recording and choose the tool for the result you want.
| Your task | Where to start |
|---|---|
| Edit one recording | Audio Editing: select waveform ranges, remove mistakes, apply effects, and export. |
| Extract a clip | Cutter: choose a portion to keep instead of deleting selected audio in the waveform editor. |
| Combine clips in order | Joiner: arrange files so they play one after another. |
| Layer voice and music | Mix or Multitrack Beta: work with sounds that play at the same time. |
| Record a new take | File > New recording in the editor, or Audio Recorder in the task hub. |
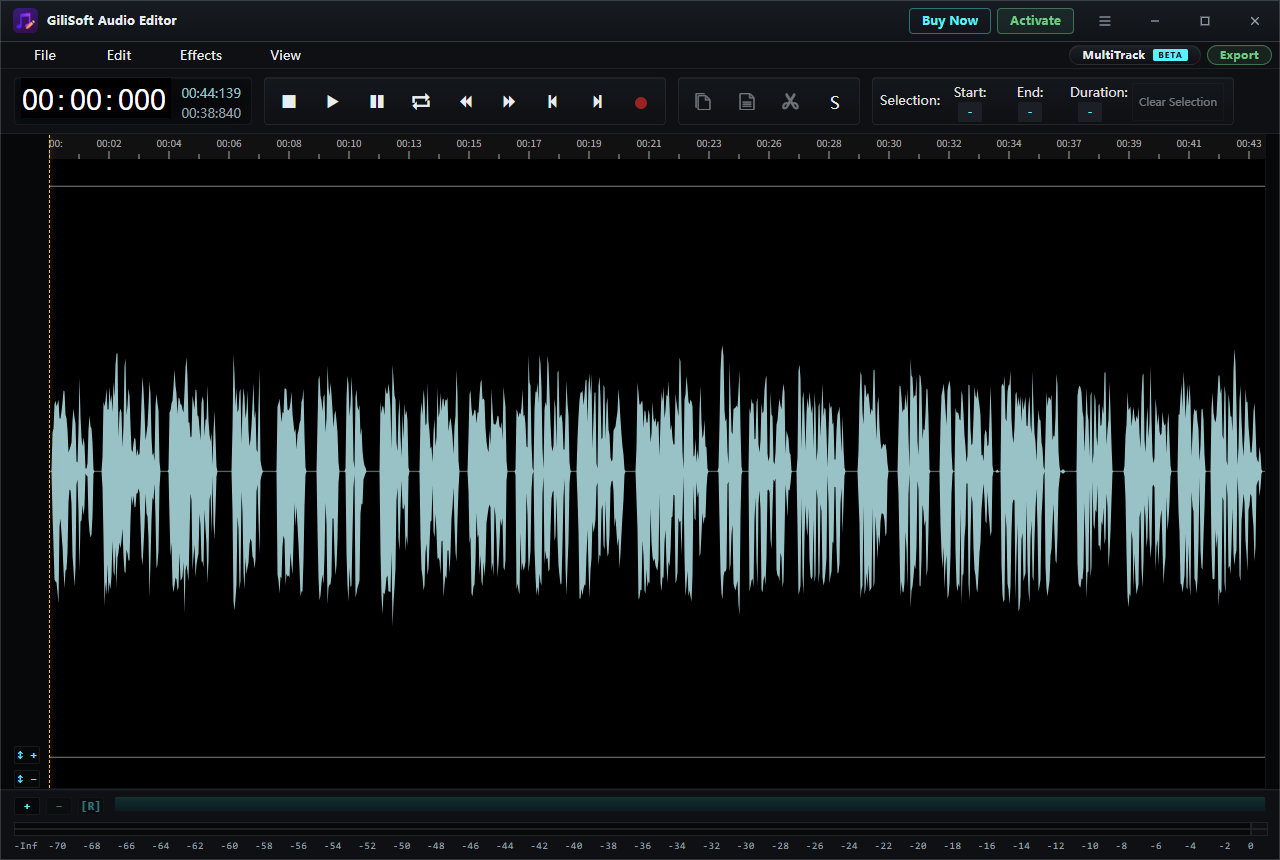
Open Audio Editing from the task hub, choose File > Load from computer, and open your source. Wait for the waveform, play a short passage, and keep the original file unchanged.
In File, Load from computer opens a local source. Load from URL is also available for a supported remote source. The same menu contains recording, local draft, and export commands.
Once the file opens, check the timeline, playback controls, and Start, End, and Duration fields above the waveform. These fields show the timing of a selection when you make one.
Drag across the unwanted range, check Start, End, and Duration, then use the scissors control. Play through both sides of the new cut and use Undo if you removed too much.
Cutting a selection removes it from the waveform. If you want to keep a short clip and discard the rest, open the dedicated Cutter task instead. For one-file cleanup, remove the unwanted opening or ending first, then inspect any mistakes inside the recording.
Use Edit > Undo to restore a change. Select All and Deselect All help control the affected range; Zero Cross Selection is worth checking when a cut produces a click. For the complete trim workflow, see how to trim audio on Windows.
Select a short opening range and choose Effects > Fade In. For a softer ending, select the final range and choose Effects > Fade Out. Preview each transition before continuing.
Apply each fade to the short range that should change, not automatically to the entire recording. A longer selection makes a more gradual transition. Listen at normal playback volume and check that the first or last word remains clear.
For more detailed examples, follow the fade in and fade out guide.
Choose File > Export or the upper-right Export button. Review the available output settings, save with a new name, and open the finished file in another player to verify the whole recording.
Use File > Export or the upper-right Export button. Choose from the settings shown in the export dialog, use a clear file name, and keep the source until the finished result has been checked.
Use File > Save draft locally, then File > Open local drafts to return to that work. Saving a draft and exporting an audio file serve different purposes; export the version you want to play or share.
Open the saved audio outside the editor. Check the beginning, each cut or join, the loudest passage, and the ending. Confirm the file plays completely on the device or app where you intend to use it.
Select a quiet passage and open Effects > Gain for a local level change. Start moderately, preview the loudest part, and reduce the change if the sound becomes harsh. Raising gain also raises noise already in the recording.
| What you hear | What to try |
|---|---|
| One passage is too quiet | Select that passage and try Gain. Listen across both boundaries so the change is not abrupt. |
| The whole file is too quiet | Inspect Normalize. See the audio normalization guide. |
| Speech alternates between loud and quiet | Try Compressor rather than simply boosting everything. See how to even out voice volume. |
| Voice sounds muddy or sharp | Make a small EQ change and compare at the same listening volume. |
| Background noise is distracting | Inspect Noise Reduction (Voice) on a short speech sample. Compare the voice before applying it more widely. |
The Effects menu lists Paragraphic EQ, Graphic EQ, and Graphic EQ (20 Bands). Work on a representative speech passage and compare a small adjustment with the original. Follow how to EQ voice recordings on Windows for the focused workflow, or the audio compressor guide for level control.
Inspect Effects > Speed / Playback Rate or Speed Up / Slow Down (Pitch). Test a short passage and listen for changes in duration and tone before exporting. The Windows audio speed guide explains that workflow in more detail.
For a recording with several problems, use the audio cleanup guide to choose a sensible order of edits.
Open Joiner from the task hub when you want separate clips to become one continuous sequence.
Include the introduction, main recording, ending, or other files that belong in the finished sequence.
Review the sequence before creating the output. Joining files does not mean they will play simultaneously.
Open the saved file and listen around every connection. Check for a repeated phrase, missing clip, long gap, or unexpected change in volume.
For a dedicated walkthrough, see how to join audio files on Windows.
For narration over music, choose Mix in the task hub or open the optional MultiTrack BETA view at the upper right of the editor. Mixing and joining solve different problems: a mix layers sounds, while a join creates a sequence.
Switch to MultiTrack BETA and drag audio files into the workspace as prompted.
The visible channel controls include mute, solo, volume, and left/right balance. Listen to sources separately before checking the combined playback.
Keep speech clear against the music and inspect the whole result. Multitrack Beta is optional; it is not needed for a simple one-file cut or fade.
Open File > New recording in the editor, or Audio Recorder in the task hub. Check the input choices and level controls offered by that recording screen, make a short test, and play it back before a full take.
After recording, trim mistakes, adjust the required passages, and export the finished audio. Use the local draft commands if you need to return to the work later. See recording, editing, and converting audio for the broader workflow.
The View menu contains Frequency Analyser, Spectrum Analyser, Multitrack Mixer, Tempo Tools, and ID3 Tags. Timeline, Follow Cursor, and zoom commands help you inspect the current workspace.
Use analysis to investigate a problem, then return to playback to judge the sound. For a voice-and-music project, check the balance by ear rather than relying only on the waveform display.
In the waveform editor, the scissors control cuts the selected audio. Select the unwanted opening, ending, or mistake, check Start, End, and Duration, then cut. To extract a clip instead, use the separate Cutter task from the task hub. Keep the source and preview the result before exporting.
Joining puts clips one after another in a single sequence. Mixing lets sounds play together, such as narration over background music. Use Joiner for a sequence, or Mix or the optional Multitrack Beta workspace for overlapping sources.
Preview both sides of the cut and move the boundary away from the middle of a word or note. Inspect Edit > Zero Cross Selection, or add a short fade where a gradual start or ending is appropriate. Check the exported file as well as editor playback.
The level change may be too large. Undo it, use a smaller Gain adjustment, and listen to the loudest passage again. Gain also raises existing background noise; it does not repair an already distorted recording.
No. Gain changes the selected signal level, Normalize adjusts level relative to a target, and Compressor reduces the difference between louder and quieter passages. Choose the effect for the problem you hear rather than applying all three automatically.
In the waveform editor, open File > New recording to start a take. File > Save draft locally keeps work for later, and File > Open local drafts reopens it. Export a finished audio file separately when it is ready to share.
No. Stay in the waveform editor for a single-file cut, Gain adjustment, or fade. Multitrack Beta is an optional workspace with separate channel lanes for multiple sources.
Choose File > Export or the Export button at the upper right. Review the options in that dialog, save under a new name, and open the finished file in another player to check its length, sound, and ending.
GiliSoft Audio Editor supports common audio inputs including MP3, WAV, M4A, AAC, FLAC, OGG, and WMA. Select the output format offered in the export dialog for your current task; input support does not mean every format is available as an export choice.
Start with the waveform editor for one recording, then use the dedicated Cutter, Joiner, or Mix tools for the task at hand.


Enter your email address to get our latest newsletter