

Private family recordings, work footage, camera archives, training videos, and evidence files should not always remain open to every person who can use the computer. Windows offers account-based and drive-based encryption, while GiliSoft File Lock Pro provides a more direct way to hide or lock selected video files without moving every video to a separate encrypted drive.
Which Video-Locking Method Should You Use?
The word lock can mean several different things. Before changing any settings, decide whether you need to protect a few local videos, an entire storage drive, or videos that will be delivered to another person.
Method 1. Lock Videos with Windows EFS
Encrypting File System (EFS) is built into supported Windows editions and ties encrypted files to the Windows user account and its encryption certificate. It can be practical for videos stored on an NTFS drive when the main concern is another Windows account opening the same files.
- Open File Explorer, right-click the video or the folder containing your videos, and choose Properties.
- On the General tab, select Advanced.
- Enable Encrypt contents to secure data, select OK, and apply the change to the file or folder.
- When Windows asks, back up the encryption certificate and key to a separate safe location.
- Sign in again and test the video before relying on the encrypted copy.
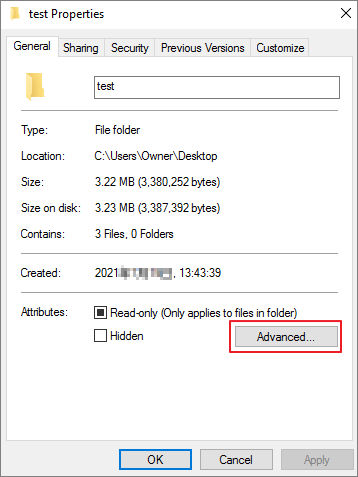 Open Advanced Attributes from the video or folder properties.
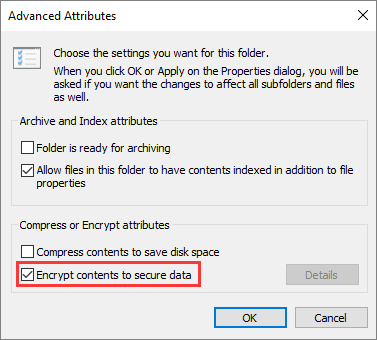 Enable Encrypt contents to secure data and apply the setting.
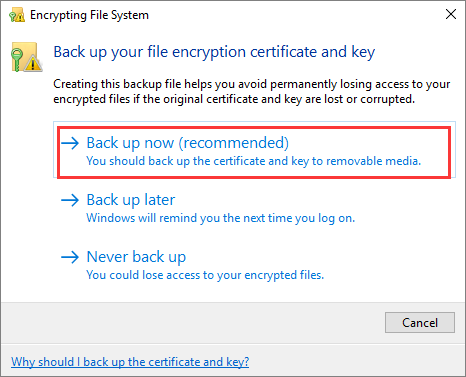 Back up the EFS certificate and key so account or system changes do not leave the videos inaccessible.
Method 2. Lock the Video Drive with BitLocker
BitLocker protects a complete drive or volume rather than one video at a time. Choose it when the videos belong on a dedicated internal volume, external drive, or removable drive and the whole storage device should remain encrypted while locked.
- Move the videos to the drive you intend to protect, then verify that every important file has a backup.
- In File Explorer, right-click the drive and choose Turn on BitLocker.
- Select a supported unlock method, create a strong password, and save the recovery key somewhere separate from the encrypted drive.
- Choose whether to encrypt used space or the entire drive, then select the appropriate encryption mode.
- Start encryption, wait for it to finish, lock the drive, and test the password and recovery process.
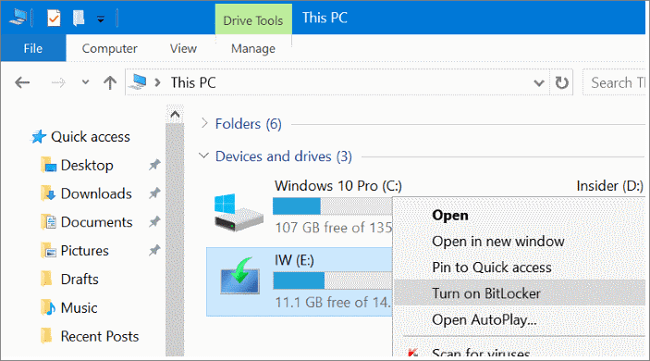 Start BitLocker from the drive menu in File Explorer.
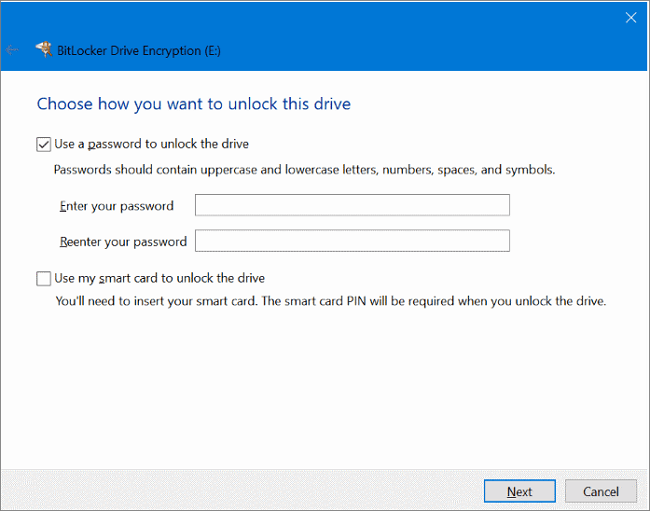 Choose the unlock method and create the drive password.
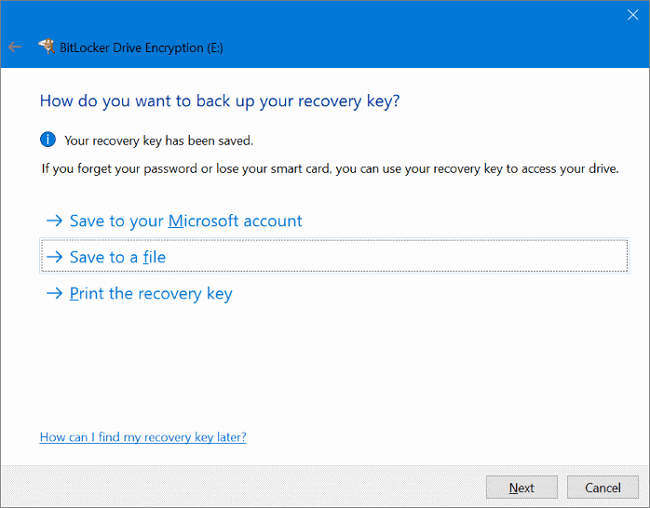 Store the recovery key away from the protected drive.
Method 3. Lock Videos with GiliSoft File Lock Pro
File Lock Pro is the direct option when you want to control selected videos, folders, or drives from one interface. You can hide private videos from ordinary File Explorer browsing, lock them against opening, or protect them from modification and deletion while keeping their familiar file locations.
- Open GiliSoft File Lock Pro and enter the master password.
- Choose Local Disk, then select Hiding File, Locking File, or Protecting File according to the result you need.
- Add the video, video folder, or drive to the list.
- Apply the selected rule and test the video from File Explorer.
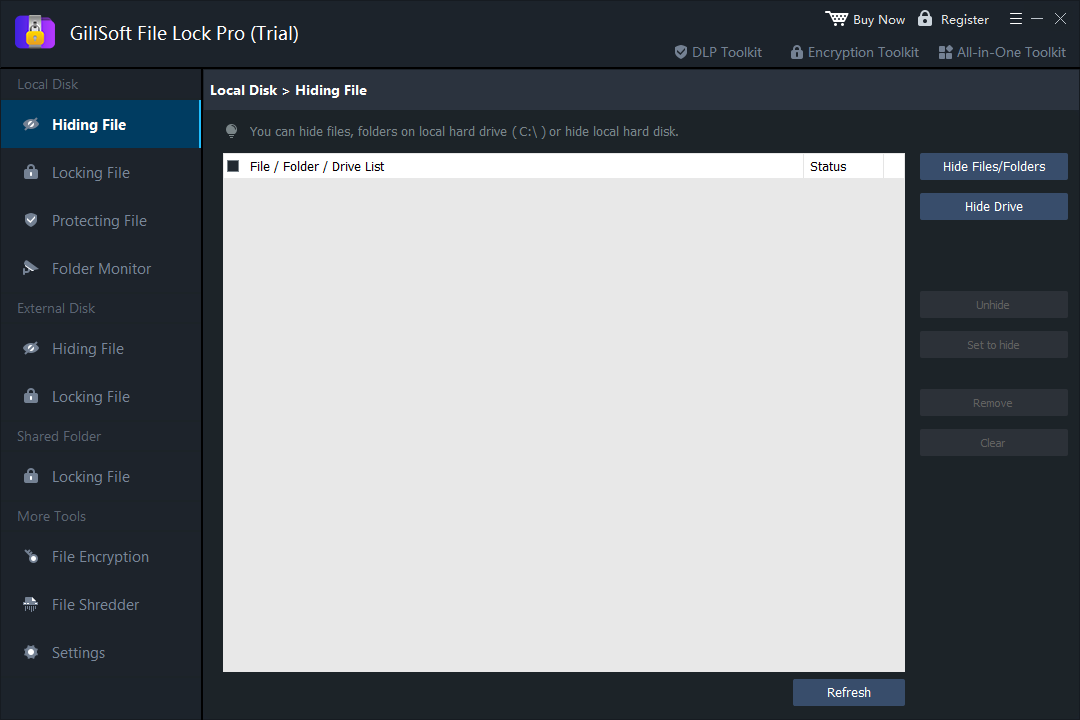 Hide selected videos, folders, or local drives from normal browsing.
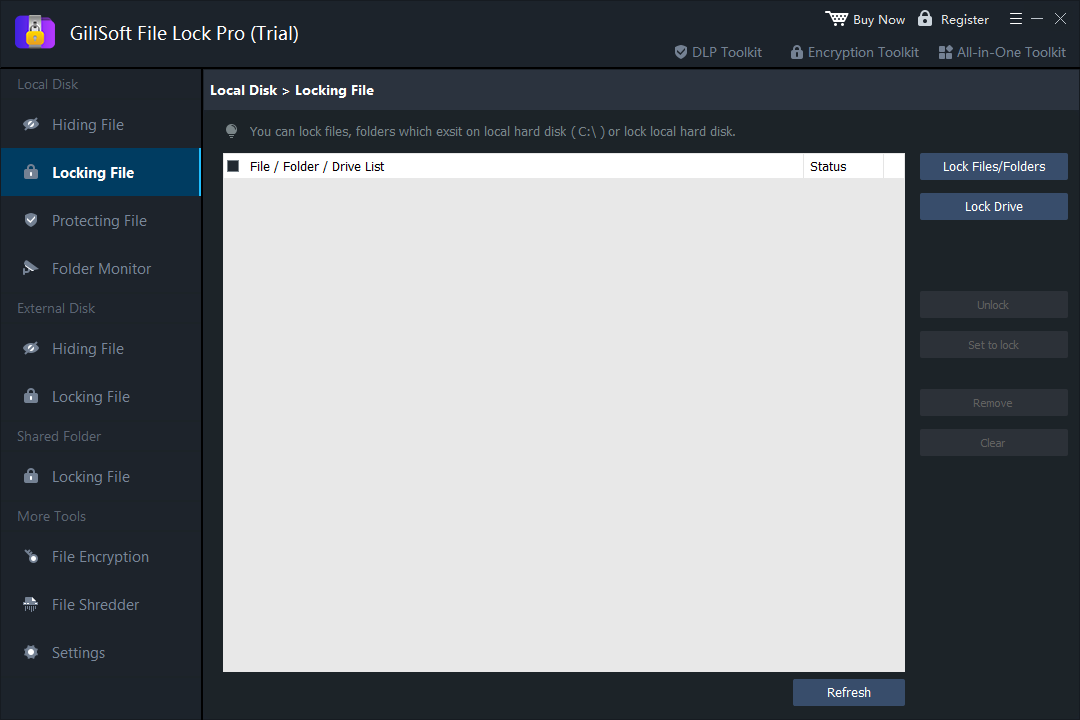 Lock videos, folders, or drives behind the File Lock Pro password.
Protect only the videos that need privacy
File Lock Pro avoids forcing unrelated files into the same drive-level rule. It also includes folder monitoring, program logs, password settings, self-protection, and exclusion controls for a more manageable local privacy setup.

What If the Locked Video Must Be Shared?
EFS, BitLocker, and File Lock Pro are primarily useful for controlling files on the Windows computer or storage device where the protection is configured. If the goal is to send a protected playable video to customers, students, partners, or family members, use a video-focused delivery format instead.
GiliSoft Any Video Encryptor creates password-protected media output for controlled playback. For commercial courses or premium media that need device binding, watermarking, password management, and revocation, see Video DRM Protection.
Video-Locking Methods Compared
| Method | Protection scope | Best use | Separate viewer password |
|---|---|---|---|
| GiliSoft File Lock Pro | Selected videos, folders, or drives | Local hiding, locking, and change protection | No |
| Windows EFS | Selected files or folders | Windows account-based local encryption | No |
| BitLocker | Complete drive or volume | Protecting all content on a storage device | Drive unlock password |
| Any Video Encryptor | Protected media output | Sending password-protected playable videos | Yes |
Frequently Asked Questions
Can I lock one video without encrypting the whole drive?
Yes. File Lock Pro can hide or lock a selected video or folder without applying BitLocker to the complete storage volume.
Does Windows 11 Home include EFS and BitLocker?
Feature availability varies by Windows edition and device configuration. Check the Advanced Attributes dialog and Windows drive-encryption settings on the actual PC before planning around either method.
Will changing the video file extension protect it?
No. Renaming MP4, MOV, AVI, or another extension may confuse casual browsing, but it does not encrypt the video or prevent someone from restoring the correct extension.
Should I lock the original video after editing?
Keep a verified backup first. Once the final file is confirmed, protect both the finished video and any source folder that still contains private clips, audio, thumbnails, or project files.
Lock private videos on your Windows PC
Use GiliSoft File Lock Pro to hide selected videos, require controlled access, and protect important footage from unwanted changes.
View GiliSoft File Lock Pro