
What Does Photo Watermark Software Do?
Photo watermark software places visible text or a graphic over an image so a published copy can carry a creator name, business name, logo, website, review status, or another authorized identifier.
A visible watermark can identify a display copy or discourage casual reuse, but it is not a complete copy-prevention system. SmugMug's official protection guidance notes that watermarks and other image-protection methods are not foolproof. For valuable originals, combine a visible mark with controlled access, lower-resolution display copies, appropriate download settings, and preserved source files.
Choose Text, Logo, Tiled, or Repeated Watermarks
The right watermark depends on whether the priority is simple identification, consistent branding, stronger visual coverage, or unobtrusive review delivery.
Text watermark
Use a photographer name, studio, project, review status, or short website address. It is fast to create and easy to update without preparing a separate graphic.
Logo image
Use an authorized brand mark, signature, or emblem. A transparent PNG normally preserves the logo shape without adding a rectangular background.
Tiled or repeated mark
Repeat the watermark across the frame when a single corner mark is too easy to crop away. Keep opacity controlled so the photo remains reviewable.
| Watermark type | Best fit | What to check |
|---|---|---|
| Small corner text | Portfolio previews, blog images, documentation, and low-risk public display copies | Readable at the final display size but separated from important details and edges |
| Transparent logo | Consistent business branding, client galleries, campaign previews, and owned social assets | Transparent background, clean edges, sufficient contrast, and correct brand proportions |
| Centered mark | Proofs or review copies where removal by a simple edge crop should be harder | Do not hide faces, product information, document text, or the feature being reviewed |
| Tiled or nine-grid mark | Proof sheets, draft images, or broad visual coverage across varied compositions | Spacing, rotation, opacity, portrait/landscape behavior, and overall readability |
How to Design a Watermark That Remains Useful
Adobe Lightroom and SmugMug expose the same practical decisions found in a dedicated watermark workflow: text or graphic content, size, color, opacity, position, and export behavior. The goal is not maximum visibility at every cost; it is an identifiable mark that still lets the intended viewer evaluate the image.
How to Add a Watermark with GiliSoft Image Editor
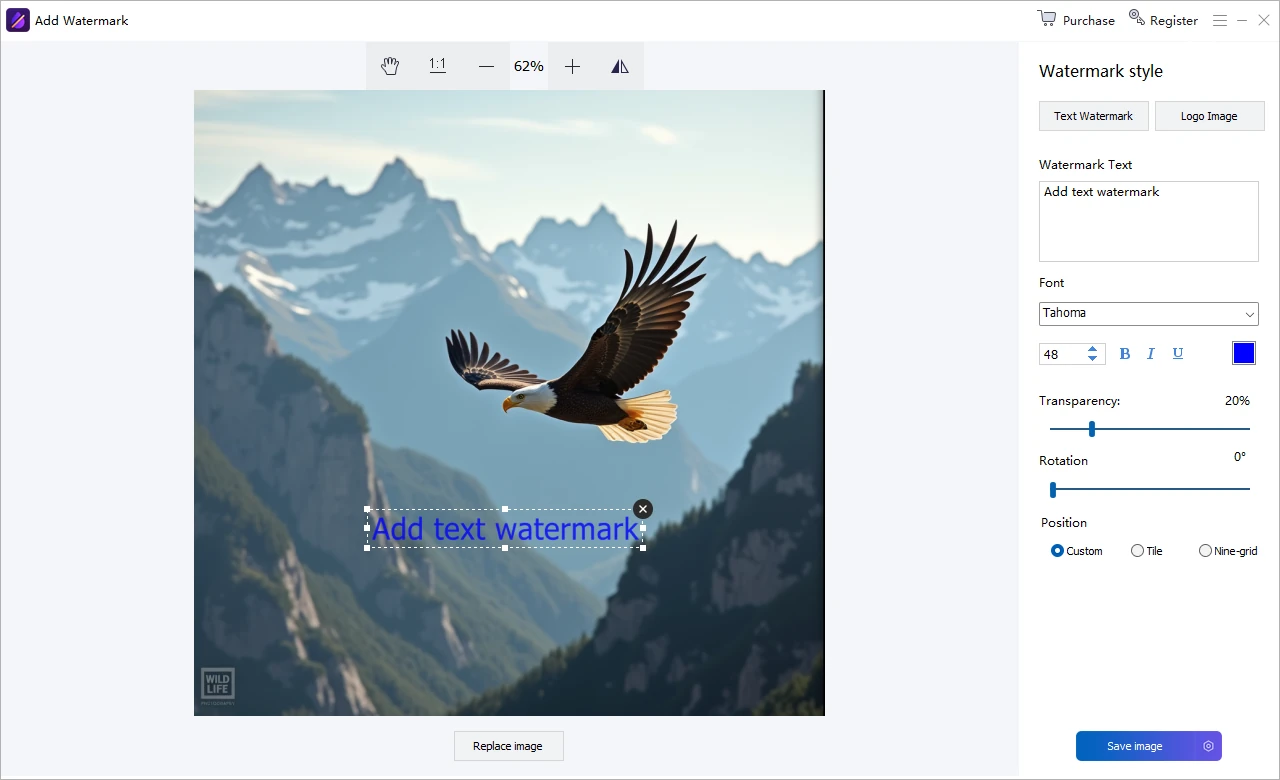
Use one representative photo to approve the content, scale, transparency, rotation, and placement before continuing with other images.
- Open a working copyKeep the clean original in a separate folder, launch GiliSoft Image Editor, and open the photo that best represents the intended output size and composition.
- Open Add WatermarkChoose the Add Watermark workspace and review the photo at a useful zoom level.
- Select Text Watermark or Logo ImageFor text, enter the short identifier and choose font, size, emphasis, and color. For a logo, select an authorized image file with clean edges.
- Adjust transparency and rotationReduce visual weight when the mark distracts from the subject, or increase contrast when it disappears into the background. Use rotation only when it improves coverage or visual fit.
- Choose the position modeUse Custom for deliberate placement, Tile for repeated coverage, or Nine-grid for a consistent anchor region.
- Inspect the complete imageCheck faces, product detail, text, borders, and busy backgrounds. Preview another orientation if the setup will be reused.
- Save a separate watermarked copyExport the result without overwriting the clean source. Open the saved file outside Image Editor and inspect it at full size and intended display size.

Try the watermark workflow on a real photo
Download GiliSoft Image Editor, test a text or logo watermark on one representative image, and approve the exported result before applying the same design to a larger set.
How to Add the Same Watermark to Multiple Photos
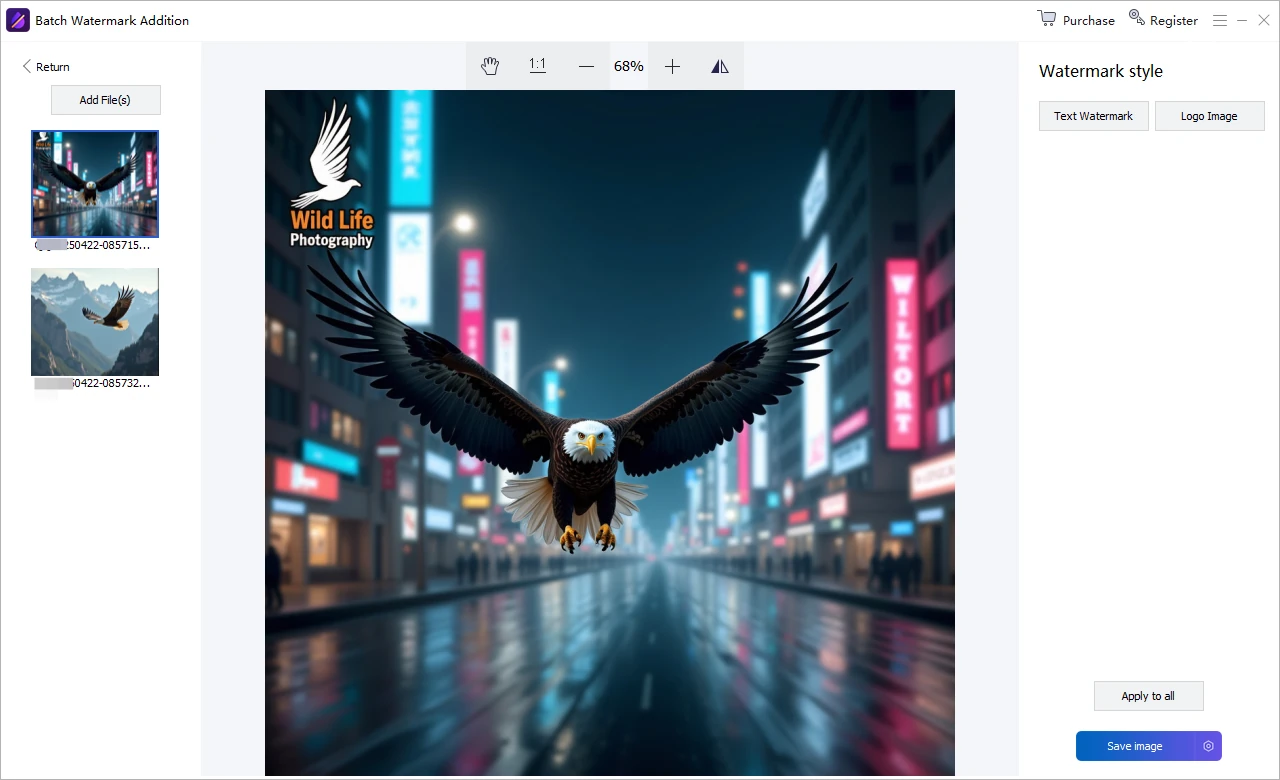
The Batch Watermark Addition workspace is useful when a client proof set, portfolio update, internal review folder, or owned publishing collection needs one consistent watermark.
- Prepare the image setGroup only the photos that should receive the same mark. Separate clean masters from batch inputs.
- Add the files to Batch Watermark AdditionLoad the intended photos and confirm the queue does not contain unrelated originals or final deliverables.
- Configure the mark on a representative imageChoose a photo with typical dimensions, contrast, and subject placement.
- Check landscape and portrait filesMove through the queue and verify that the same scale and position do not cover important content on another orientation.
- Use Apply to allApply the approved setup only after the sample images look correct.
- Inspect exported filesOpen several outputs from different parts of the set and verify watermark consistency, image quality, and destination folders.
Custom, Tile, and Nine-grid Placement Compared
Custom placement
Move the mark to a deliberate location that avoids the subject. Best for one image or a visually consistent set where the same region remains clear.
Tile placement
Repeat the mark across the image for broader proof coverage. Reduce opacity and spacing carefully so reviewers can still inspect the underlying photograph.
Nine-grid placement
Anchor the mark to a predictable area such as a corner, edge center, or image center. Useful when consistent alignment matters across similarly framed photos.
Centered coverage
Use for drafts and proofs where a corner mark could be removed by cropping. Keep the mark readable without hiding the feature under review.
Position for the final crop, not only the source
Websites and social platforms may crop images into square, portrait, landscape, or responsive containers. Leave a safe margin and preview the destination layout so a corner watermark is not cut off or pushed against the edge.
Check Publishing Rules Before Adding a Watermark
A watermark that is appropriate for a portfolio or client proof may violate a marketplace's image policy. Keep a clean master and create destination-specific copies.
| Destination | Watermark decision | Practical workflow |
|---|---|---|
| Owned website or blog | The site owner controls the presentation, subject to image and brand rights. | Use a subtle text or logo mark on display copies and retain higher-quality clean originals separately. |
| Client proofs and draft reviews | Centered, tiled, or repeated coverage can identify non-final copies. | Export proof versions separately and deliver clean finals only through the approved process. |
| Social media | Platform crops and recompression can reduce visibility or remove edge placement. | Preview mobile crops and use a safe margin; do not rely on the watermark as the only protection. |
| eBay listings | eBay's current picture policy prohibits watermarks, added text, artwork, marketing material, and borders. | Upload clean listing photos without a watermark. |
| Amazon main images | Amazon main-image guidance generally excludes text, logos, graphics, and watermarks and often requires pure white backgrounds. | Use a clean compliant main image and verify category-specific requirements before preparing additional images. |
| Etsy listings | Use only images and branding you have rights to, while checking how the first image and thumbnails are cropped. | Keep important product detail clear and test whether the watermark remains appropriate in all thumbnail shapes. |
Policy references: eBay Picture Policy, Amazon product photo guidance, and Etsy image requirements.
Common Photo Watermark Mistakes
Making the watermark larger than the subject
A mark that prevents viewers from evaluating the image defeats the purpose of a portfolio preview, product photo, or client proof. Match visual weight to the publishing goal.
Using one color on every background
A pale mark can disappear over sky while a dark mark can vanish in shadows. Test representative bright, dark, detailed, and low-contrast images.
Applying one batch position without review
Landscape and portrait photos rarely leave the same clear area. Split different compositions into separate batches when the mark covers important content.
Overwriting the clean source
A future client, marketplace, print job, or redesigned website may require an unwatermarked file. Preserve originals and export watermarked display copies.
Treating a watermark as complete protection
A visible mark can be cropped, covered, or reconstructed. Use it as identification or deterrence, not as a guarantee against copying.
Research Sources
The guidance above combines official documentation about watermark controls, export workflow, image protection, and marketplace restrictions.
- Adobe Lightroom export documentation - export copies and graphic watermark settings.
- Adobe Lightroom mobile watermark guide - adding text or graphic watermarks during export.
- SmugMug watermark documentation - text and image marks, font, size, color, transparency, position, and display-copy behavior.
- SmugMug image protection guidance - watermarks, display-size limits, download controls, and the limits of protection methods.
- eBay Picture Policy - prohibition on listing-photo watermarks, text, artwork, marketing material, and borders.
- Amazon product photo guidance - main-image expectations, white backgrounds, resolution, and common mistakes.
Photo Watermark Software FAQ
Can GiliSoft Image Editor add both text and logo watermarks?
Yes. The Add Watermark workspace provides separate Text Watermark and Logo Image modes.
Can the watermark transparency and rotation be changed?
Yes. The workspace includes transparency and rotation controls along with font, size, color, and positioning options.
Can the same watermark be added to multiple photos?
Yes. Use Batch Watermark Addition, add the image set, preview the watermark on representative files, and use Apply to all when the placement is suitable.
Does a watermark completely prevent image copying?
No. A visible watermark can identify or discourage casual reuse, but it is not foolproof and does not replace access control, lower-resolution display copies, or legal copyright enforcement.
Should the original photo be overwritten?
No. Keep the unwatermarked original and export a separate watermarked copy for publishing or delivery.


