

Can I Lock a Folder or File on My Computer?
Yes. You can lock either a file or a folder on a Windows computer. Before you begin, decide whether the information belongs together and should be protected as one group, or whether only one or two individual files need special handling.
Lock a file or lock a folder: which is better?
| Comparison | Lock a folder | Lock a file |
|---|---|---|
| Advantages |
|
|
| Tradeoffs |
|
|
If you need to protect a collection of documents, photos, project files, or private records, place them in one folder and lock the folder. If only one or two files are sensitive, file-level protection may be enough.
Practical recommendation: keeping valuable files together in a clearly named folder makes protection easier to apply, verify, and maintain.
How to Lock a Folder in Windows 11/10: 5 Methods
Start by organizing the files you want to protect, then choose the method that matches how the folder will be used.
Collect the documents and files that belong together.
Choose direct folder control, encryption, an archive, or a visibility setting.
Method 1. Lock a Folder with Folder Password Software
GiliSoft File Lock Pro is designed to password protect folders, files, and drives on Windows computers. It is the most direct choice in this guide when a folder should remain in its normal location but should not open for an unauthorized user.
In addition to locking a folder, the current product can handle these related privacy tasks:
- Hide files, folders, or an entire local drive.
- Lock files, folders, or drives on local storage.
- Protect selected local files and folders from unwanted operations.
- Hide files and folders on external storage.
- Lock folders on USB and external drives.
- Lock a network LAN shared folder.
- Encrypt files and folders into GFL or EXE output.
- Monitor folder changes and keep program logs.
- Securely shred unwanted files, folders, or drive data.
How to use GiliSoft File Lock Pro
- Launch GiliSoft File Lock Pro and enter the master password. Set a recovery email in Settings so the password can be recovered if necessary.
- Choose Local Disk, then select Locking File. This screen can accept files, folders, and local drives.
- Click Lock Files/Folders, choose the target folder, and confirm the selection.
- Check that the folder appears in the protection list, then test access from Windows File Explorer.
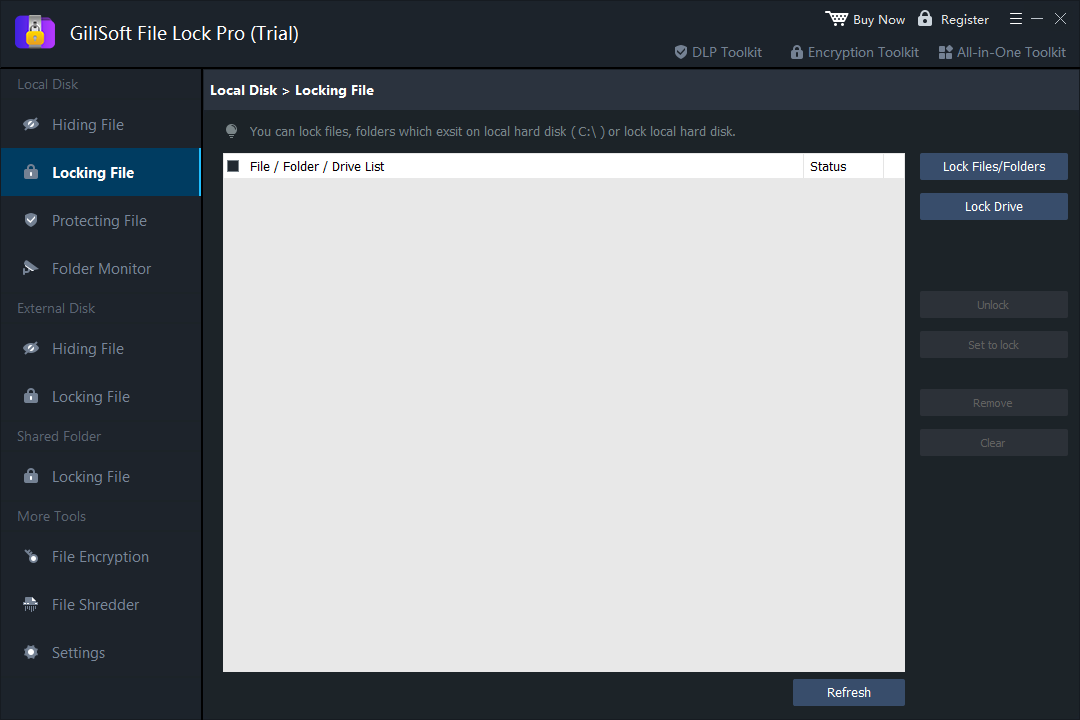 The Local Disk locking screen accepts files, folders, and drives.
Method 2. Password Lock a Folder with a Batch File
If you prefer a manual method, a batch file can create a folder named Locker, rename it to a special Windows Control Panel identifier, and hide it until the expected password is entered.
- Open the target folder, right-click an empty area, and choose New > Text Document.
- Open the text document and add a folder-lock batch script. Replace its placeholder password with your own text.
- Choose File > Save As, set Save as type to All Files, and name the file FolderLocker.bat.
- Run FolderLocker.bat once to create the Locker folder, then move the files you want to conceal into it.
- Run the BAT file again, type Y, and press Enter to hide the Locker folder.
- To show it again, run the BAT file, enter the password, and press Enter.
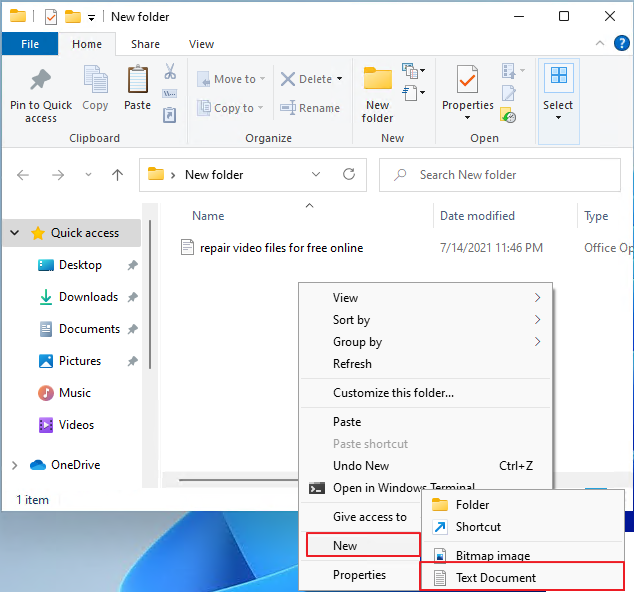 Create a text document inside the folder you want to organize.
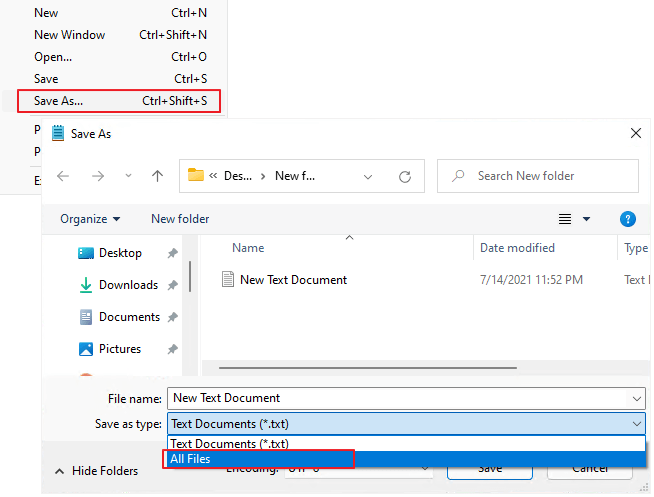 Save the script as FolderLocker.bat using the All Files file type.
Method 3. Encrypt a Folder with Windows Folder Properties
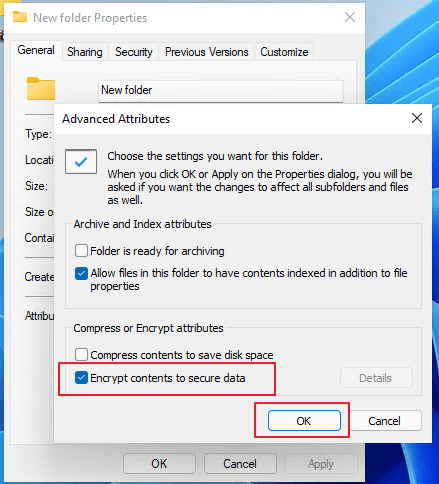
Folder Properties includes an encryption option on supported Windows editions. EFS encrypts the folder for the current Windows account rather than adding an independent password prompt.
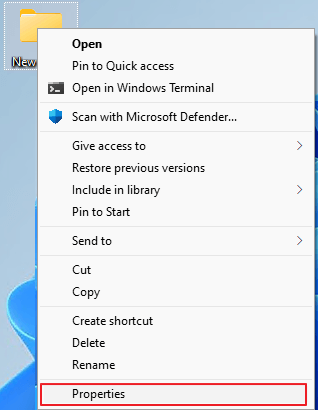
- Right-click the target folder and choose Properties.
- On the General tab, click Advanced.
- Select Encrypt contents to secure data, click OK, and apply the change to the folder and its contents.
- Back up the EFS certificate and private key before reinstalling Windows, changing accounts, or moving the files.
Method 4. Compress a Folder with a Password
Another common approach is to compress the folder into an encrypted archive. This creates a separate protected copy and works well when files will be sent, uploaded, or stored rather than edited every day.
- Right-click the target folder and choose the archive utility’s Add to archive command.
- Choose the archive name, format, compression level, and destination.
- Open the password or encryption settings, enter a strong password, and confirm it.
- Create the archive, test the password, and only then decide whether the unprotected source folder should remain.
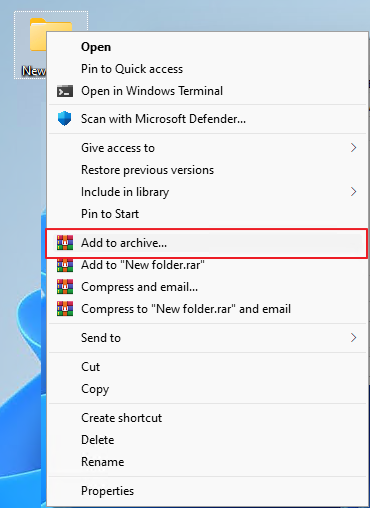 Open the archive creation dialog from the folder’s context menu.
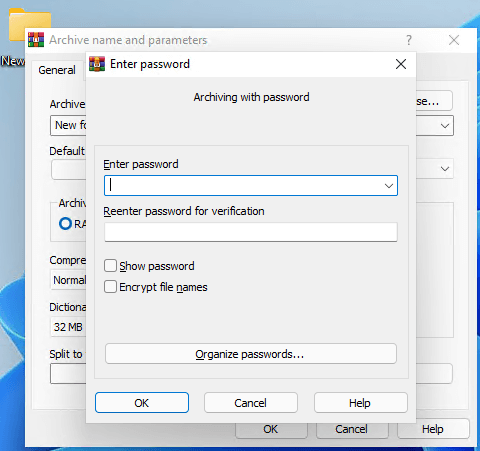 Set and confirm the archive password before creating the protected copy.
Method 5. Hide a Folder in Windows
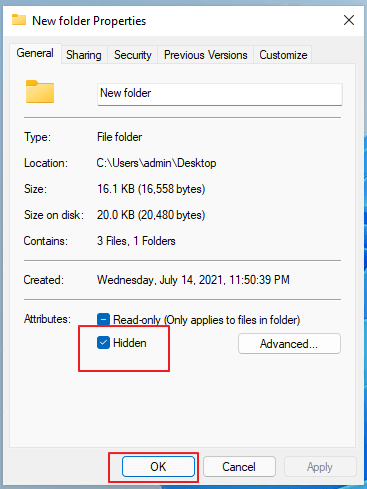
The final built-in method is to mark the folder as Hidden. This removes it from normal File Explorer views, but it does not encrypt the contents or add a password.
- Right-click the target folder and select Properties.
- On the General tab, select Hidden, click OK, and apply the change.
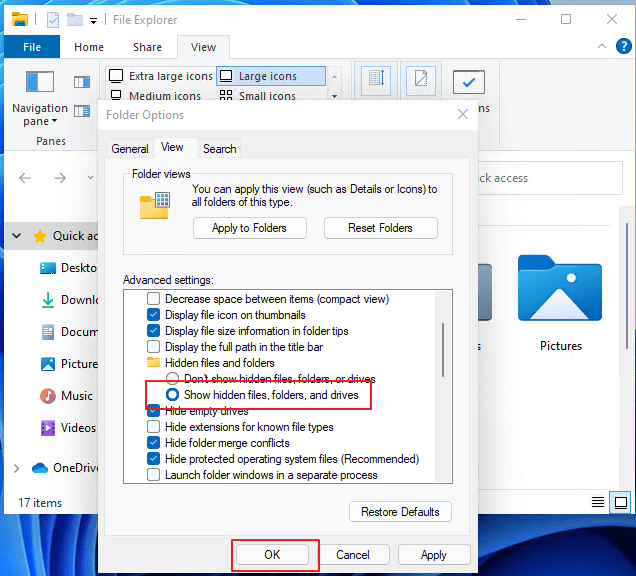
- To display it again, enable Hidden items in File Explorer or choose Show hidden files, folders, and drives in Folder Options.
Protect Important Information by Locking the Folder Now
Locking a folder is usually more efficient than protecting many related files one by one. The five methods above cover direct access control, account-bound encryption, protected archives, and basic visibility changes.
For advanced folder tasks such as locking local and external folders, hiding folders, protecting shared folders, monitoring changes, and securely deleting unwanted data, GiliSoft File Lock Pro provides the most complete single workflow in this comparison.