Turn document photos into editable text, scripts into spoken audio, and photos into ready-to-use visuals. Open the tool you need and save a new result on Windows.
Extract editable text from images and recordings
Create narration with speaker voices or a custom voice
Swap photo faces, remove backgrounds, and clean images
Choose what you want to make: editable text from an image, narration from a script, a transcript from a recording, a custom voice, or an edited photo. Open the matching tutorial below for its buttons, settings, and saved-file checks.
Open the actual output in the application where it will be used.
Open the Tool You Need
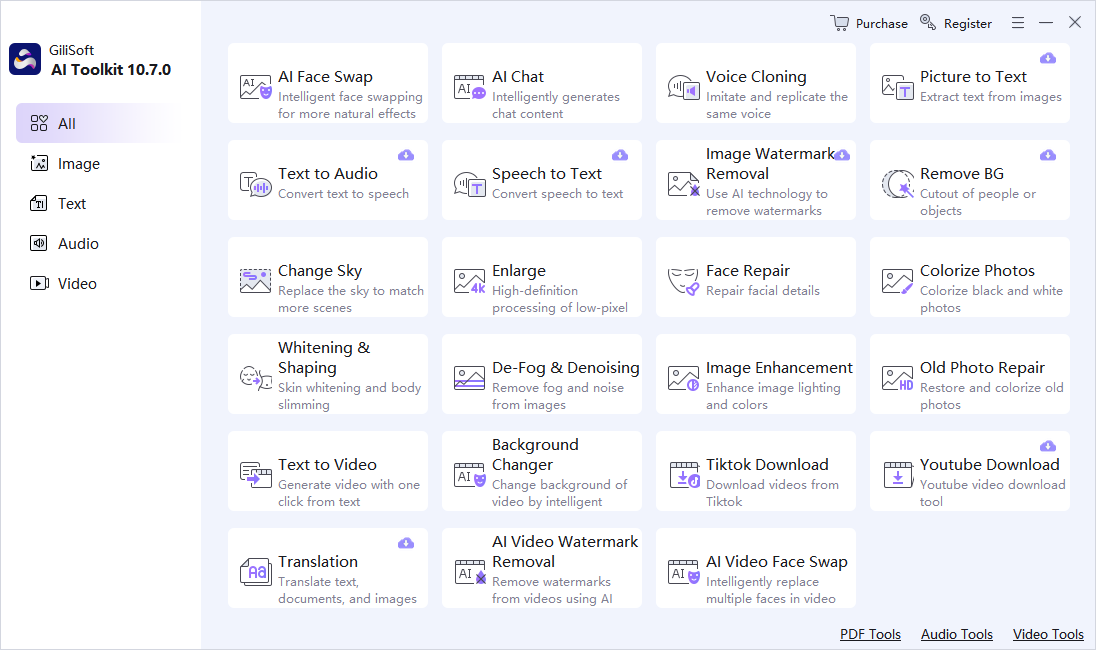
Find a Tool on the Dashboard
Choose a category on the dashboard
Use All to view the collection, or Image, Text, Audio, and Video to narrow the entries.
Open the named tool for your source
Choose Picture to Text for image text, Text to Audio for a script, or Speech to Text for a recording. Use Voice Cloning, AI Face Swap, or a photo tool for those tasks.
Check the opened tool's inputs and output controls
Confirm that you have the intended tool before adding files. Some entries open a separate window with its own language, save location, and processing buttons.
The dashboard opens individual tools. Choose the named entry for your source instead of looking for one universal processing button.
Recognize Text from Images and Recordings
Extract Text from a Picture
Use Picture to Text to recognize characters in an image and copy them into notes or a document.
1Load the source picture
Open Picture to Text from GiliSoft AI Toolkit and select Load file. Choose a clear screenshot, scan, or photographed page and confirm the intended image appears in the preview.
2Choose the language and save directory
Set Language to match the text in the picture, not simply the language of the application menus. Review Save directory and choose Source Directory or Custom according to where you want the output.
Set Language for the text in your image. This trial example shows partial result access, so review both the recognition and activation status.
3Recognize and review the text
Select Recognize and inspect the Recognition result. Compare it with the source for reading order, names, numbers, and missing lines. The pictured trial screen restricts part of the result behind Register to view all content; check the installed trial or activation state if this appears.
4Copy the reviewed result into your document
Use Copy content to copy the available recognized text, paste it into your document or notes, and correct any remaining errors. Keep the source image and verify the saved text; OCR does not automatically recreate the original document's complete layout.
Correct an OCR Result
Compare the result with the source image
Check Recognition result for missing lines, merged columns, wrong characters, and the order of headings or labels.
Improve the input or language and recognize again
Use a sharper, straighter source where possible and choose the correct Language. For a difficult layout, work from a clearer or more focused image rather than assuming OCR recreates a page design automatically.
Correct the text where you will use it
Select Copy content, paste the result into your document, and check names, amounts, dates, and punctuation. Save the reviewed document with the source image still available.
Turn a Recording into Text
Open Speech to Text and add the recording
Choose Speech to Text on the dashboard. In the Audio to Text window, use Add File to import a supported audio or video source.
Set Language and Save directory
Choose the spoken language and review Save directory. Use Source Directory or Custom for the intended destination.
Select Extract and review the text
Use Extract, inspect the returned text and saved result, and compare important passages with the recording. Keep the original for corrections.
This is the input screen before a recording has been loaded. Use Extract for transcription; do not assume the text is a timecoded subtitle file.
Review and Reuse a Transcript
Check the text against the recording
Listen to sections containing names, numbers, abbreviations, or unclear speech and compare those sections with the recognized text.
Edit the document for its intended use
Correct recognition errors and organize notes or paragraphs in the application where the transcript will be used. Keep quotations distinguishable from your own summary.
Save and reopen the reviewed text
Retain both the source recording and the corrected text. If you need timed subtitles, verify a tool's actual timecode and subtitle-export options rather than renaming the transcript as a subtitle file.
Create Narration and Use a Custom Voice
Turn a Script into Spoken Audio
Open Text to Audio and enter the script
Choose Text to Audio on the dashboard. In Text to Speech, type into Text content or use Load File for a supported script file.
Choose the voice and listen
Set Language and Speaker, review Speech rate and Volume, then select Preview. Correct wording, punctuation, or pronunciation before generating the complete result.
Set the output and Convert
Choose the offered Output format and Save directory, then select Convert. Open the saved audio in a player and check that it contains the intended script.
Preview is for listening and checking the voice. Use Convert to create the output in the selected save directory.
Adjust Pace, Pauses, and Background Music
Review pace and pauses
Adjust Speech rate and use Insert silence where the script needs a pause. Preview the affected sentence before changing the full script.
Balance voice and optional music
Use Volume for the speech. If adding Background music, choose the audio and review Background volume so narration remains clear.
Convert and check the saved audio
Listen for rushed names, unnatural gaps, clipped endings, or music that competes with speech. Revise the script or settings, then create and verify a new output.
Open Batch or Long Text to Speech
Choose the tab that fits the text task
In Text to Speech, use Batch Text to Speech for several items or Long Text to Speech for a longer script.
Add the content and review that tab's settings
Use the input controls shown in the selected tab and check its available language, speaker, output, and destination settings. Do not assume the short-text panel's displayed character count is the limit for every tab or license.
Test the output before a larger run
Generate a representative item or section using that tab's controls and check pronunciation and the saved audio. Verify the beginning and end of the remaining outputs after processing.
The Text to Speech screenshot shows the separate batch and long-text entries in the left navigation.
Prepare a Custom Voice
Prepare a clear reference recording
Use a clean, single-speaker recording of your own voice, with little background noise and no competing music. Keep the source available for another attempt.
Open Voice Clone to add the reference
Choose Voice Cloning from the dashboard and select Voice Clone in the opened window. Add the reference and complete the details requested in that form.
Review status before generating new speech
Use Task Center to check the submitted task where applicable. Once a prepared voice is available, select it from List of Speakers and follow the speech-generation task below.
The main voice window is shown in the Voice Clone screenshot. The reference-recording form opens from Voice Clone; the text-entry area is used for the script to be spoken.
Generate Speech with a Prepared Voice
Choose a prepared speaker
Select the intended entry under List of Speakers and use Audition to check the speaker where a sample is available.
Enter the new script
In Text to Voice, enter the text or use the offered Import File control, then choose Text language. Keep the script short for the first test.
Set Save directory and Start
Review Save directory, then select Start when the required input and voice are ready. Listen to the saved audio and check names, pronunciation, pace, and the complete ending.
Prepare a voice through Voice Clone, then select it for new text-based speech. The pictured text area is empty and Start is disabled; it is not a completed generation.
Swap Photo Faces and Edit Images
Swap a Face in a Photo
Load the base photo and the face image
Open AI Face Swap. Use Upload original image for the photo to edit and Upload face image for the face to use. The two inputs have different roles.
Choose which face to replace
Under Select the face to be replaced, select the intended detected face from the original photo. Use Replace beside an input if the source needs changing.
Select Start and inspect the saved result
Choose Start, review the generated photo, and save a new copy using the result controls offered. Check face edges, angle, lighting, skin tones, and retained details outside the replaced area.
The screenshot is for photo face swap. It is not the control screen for the separate AI Video Face Swap entry on the dashboard.
Remove a Photo Background
Open Remove BG and load the photo
Choose Remove BG from the dashboard and load the subject image in the cutout tool. Use Replace when another source is needed.
Run Cutout and review transparency
Use Cutout and inspect hair, clothing, and subject edges. For a transparent result, review Keep transparent and turn off a background filling or blur treatment that is not intended.
Review Background size and Save
Check Background size, then use Save with a transparency-capable output setting if transparency is needed. Open the saved image in the receiving app and check the background and edges.
The pictured example has Background filling selected. Review Keep transparent separately when the required output is a cutout without a filled background.
Replace or Blur the Background
Start from the cutout and choose the treatment
After reviewing the subject edges, choose Background blur for a blurred backdrop or Background filling for a replacement background.
Adjust the chosen background
Review the blur slider, or choose Color or Picture under Background filling. Check Background size and the subject's framing.
Save and inspect the composition
Use Save to create a separate result. Check the complete subject, hair and clothing edges, background treatment, and dimensions in the saved image.
Remove an Image Mark or Object
Open Image Watermark Removal
Choose Image Watermark Removal from the dashboard and load the photo. Keep an unchanged original.
Select and remove the unwanted area
Use Smart Pen, Brush, Shape, or Lasso. Review Radius, correct excess selection with Eraser, and select Remove for the chosen region.
Inspect at full size and Save Image
Use 1:1 to inspect the repaired area. Undo and refine a weak result, then use Save Image to save a new copy and check it outside the tool.
This tool repairs visible image regions and saves an image. For editable recognized text, use Picture to Text rather than assuming the cleanup tool's OCR Recognition produces a transcript.
Open Photo Repair or Enhancement
Choose the photo task from the dashboard
Use Enlarge for image enlargement, Image Enhancement for a visual improvement, Face Repair for face detail, Colorize Photos for colorization, or Old Photo Repair for an old photograph.
Load a copy and review the selected tool's options
Add the source in that tool and choose the processing options it offers. Start with a representative photo rather than assuming every entry shares the same settings.
Process, save, and compare with the original
Use the tool's own processing and save controls. Inspect text, faces, fine detail, colors, and the complete saved image before using the same settings on more photos.
Other Tools, Trial Access, and Saved Files
Find Chat, Translation, and Video Tools
Find the exact entry for the next task
Use All or the relevant category to find AI Chat, Translation, Text to Video, AI Video Watermark Removal, or AI Video Face Swap.
Open that tool and add its required source
Use the selected tool's own text, document, image, or video inputs and review the settings and processing requirements shown there. The photo face-swap controls are not instructions for video face swap.
Check and save the result for its intended use
Review wording and meaning for text, or the relevant frames and sound for video. Save a new output and inspect it in its receiving application before continuing with a larger job.
Choose Where Results Are Saved
Review the destination in the active tool
Check Save directory in the OCR, speech, transcription, or voice tool. Where offered, choose Source Directory to save near the source or Custom for another folder.
Choose a clear, writable destination
Keep originals and results distinguishable and use a folder with enough free space. In photo tools, review the destination offered by Save or Save Image.
Open the actual saved file
After processing, locate the output and open it in a document editor, audio player, or image viewer. A preview or task-list entry is not the same as a checked saved result.
Check Trial and Activation Requirements
Identify the installed tool and its trial state
Check the title and any Register, activation, or restricted-output message. The OCR example includes Register to view all content.
Review the requirement for the task you need
Check that tool's trial limits and any setup or connection prompt. Do not assume every tool has the same limits, one processing allowance, or identical online requirements.
Choose the intended license and verify access
The purchase link in this guide shows $39.95 / 1 Year / 1 PC. Review the plan on the purchase page, then verify the relevant tool's activation and required output before a larger task.
Check the Saved Text, Audio, or Image
Check the content, not just whether a task finished
For text, compare names, numbers, punctuation, and reading order. For audio, listen to the complete narration and ending. For an image, inspect edges, faces, colors, and fine detail at full size.
Verify the actual saved output
Open the saved text, audio, or image in the application where it will be used. Confirm the file, format, dimensions or duration, and destination.
Retain a source and a reviewed copy
Keep the original and the checked result with clear filenames. If a problem remains, revise the source or relevant settings and create another output instead of repeatedly overwriting the only copy.
Quick Checks for Common Problems
What happens
What to check
OCR words or reading order are wrong
Match Language to the source text, improve image clarity, and review columns, names, and numbers after Recognize.
Part of the OCR result is hidden
Check the trial or Register message. Restricted access is different from a recognition error.
The narration sounds wrong
Check Language, Speaker, punctuation, Speech rate, and pauses with Preview before Convert.
You heard Preview but cannot find a speech file
Set Output format and Save directory, then use Convert and check that destination.
The transcript needs correction
Compare difficult passages with the recording and review the spoken Language before Extract.
A custom voice is not ready to use
Review Voice Clone or Task Center, select the intended prepared speaker, and check text and language before Start.
The cutout has the wrong background
Review Keep transparent, Background filling, Background blur, and Background size, then check the saved file.
A face edit looks unnatural
Confirm the two source roles and selected target face. Review angle, lighting, face edges, and the complete photo.
AI Toolkit FAQ
Why is OCR text inaccurate?
Check that Language matches the words in the source image. Use a sharper, straighter image with readable contrast, then compare the recognized text with the source. Review columns, names, numbers, and reading order manually.
Why does generated speech pronounce a word incorrectly?
Check Language and Speaker, adjust spelling or punctuation, and use Preview on a shorter sentence. Review Speech rate and pauses before selecting Convert again.
Why does a cutout have rough edges?
Use a clearer, larger source with better separation between the subject and background. Inspect hair, transparent areas, shadows, and clothing edges at full size, then verify the saved result.
Why does a face result look unnatural?
Use source images with compatible face angle, lighting, expression, and resolution. Confirm the intended face is selected under Select the face to be replaced. Check the saved photo for edges, skin tones, and retained details.
Should I overwrite the original file?
No. Save generated output separately and open the saved file in its intended application before replacing or discarding anything. Keep the original available for corrections.
Where can I see every available tool?
Open the AI Toolkit dashboard and use All or the Image, Text, Audio, and Video categories. The GiliSoft AI Toolkit product page lists the main tool groups; the installed build shows the available entries.
Which button runs each task?
Picture to Text uses Recognize and Copy content. Text to Speech has Preview and Convert. Audio to Text uses Extract. Voice Clone has its own Start control. The cutout tool uses Save, and image cleanup uses Save Image. Follow the controls in the tool you opened.
Is a transcript the same as a timed subtitle file?
No. Editable recognized text and a subtitle file with timecodes are different outputs. The pictured Audio to Text panel shows Add File, Language, Save directory, and Extract; it does not establish SRT or other timecoded subtitle export.
Why is part of the OCR result blurred or hidden?
The pictured trial includes Register to view all content. Review the installed trial and activation status rather than treating that restriction as a recognition error. Trial limits can differ among tools.
Does Preview create the final speech file?
Use Preview to listen and check pronunciation. Set Output format and Save directory, then use Convert to create the speech output. Open the saved file afterward to confirm its contents.
Is GiliSoft AI Toolkit free?
A trial download is available. The purchase buttons in this guide link to the 1 Year / 1 PC offer at $39.95; the purchase page also lists monthly and lifetime plans. Check the selected tool's trial, activation, and connection requirements before choosing a plan.