How to Use GiliSoft Audio Recorder for Mac
Choose the sound you need, set the output, and make a short test before recording the full session. This screenshot guide covers source selection, recording controls, saved files, and automatic stop and split rules.
How do I record audio on my Mac?
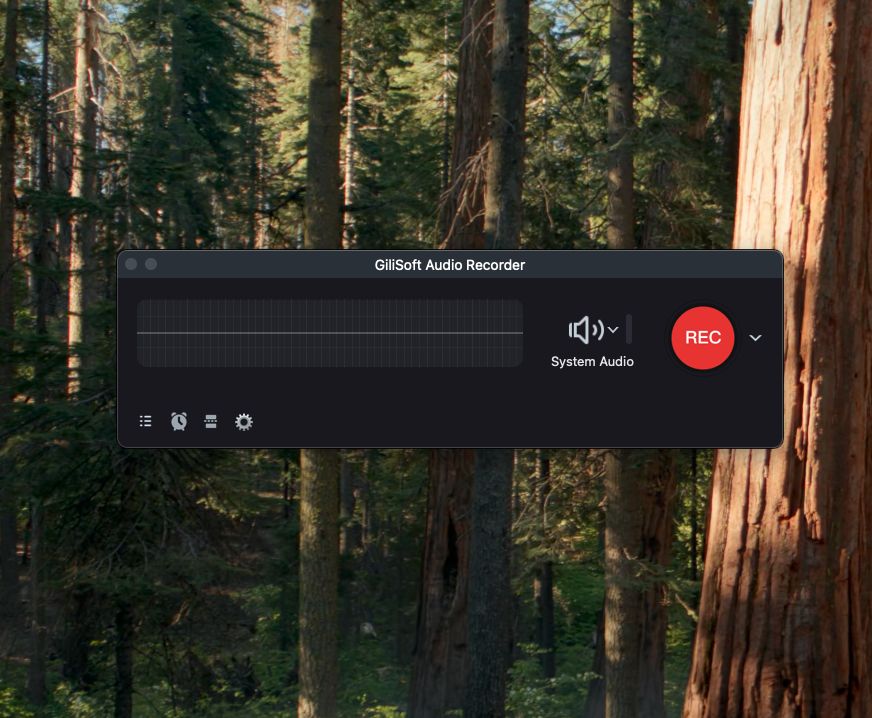
Choose System Audio, Microphone, or System&Mic beside REC. Open Settings to choose the format and Output folder, then select REC. Stop the recording and play it from File list. If the file is silent, check the selected source and the relevant macOS permissions before trying a longer session.
Install the Mac app and allow the recording permissions
Use the macOS installer to install GiliSoft Audio Recorder for Mac. Connect the microphone or headphones you plan to use, choose a save folder with enough free space, and open the app.
For your microphone
Open System Settings > Privacy & Security > Microphone and enable the recorder's access. If you change access, close and reopen the app before testing. Older macOS versions use System Preferences and Security & Privacy instead.
See Apple's microphone recording help for the path on your macOS version.
For sound playing on the Mac
Allow the recording access requested by the app. On current macOS versions, review System Settings > Privacy & Security > Screen & System Audio Recording. Follow any prompt to reopen the recorder; permission labels vary by macOS version.
The compact main panel keeps the source menu and REC together. The lower icons open the file list, timing controls, file splitting, and Settings.
1Choose System Audio, Microphone, or System&Mic
Open the source menu beside REC and choose System Audio for Mac playback, Microphone for voice input, or System&Mic for both. Play a sample and speak if the session needs your voice.
| Source | Use it for |
|---|---|
| System Audio | Playback from a browser, media player, online lesson, radio stream, or another Mac app. |
| Microphone | Voice notes, narration, interviews, or sound from the microphone input selected on the Mac. |
| System&Mic | Mac playback plus your spoken explanation in the same recorded session. |
For voice input, check the intended microphone in the Mac's Sound settings before recording. If you change from the built-in microphone to a USB device or headset, repeat the saved test so you know the right input is being captured.
2Set the audio format and output folder
Open Settings using the gear icon. Choose Audio format and use Choose beside Output to select the save folder. Check the recording shortcuts before closing the panel.
- Audio format
- Choose MP3 for convenient sharing, M4A for Apple audio workflows, or WAV when uncompressed audio is useful for later editing.
- Output
- Select Choose and pick a recognizable folder. Check free space before a long session, especially with WAV.
- Start/Stop Recording
- Set a shortcut for beginning and finishing capture. Make sure it does not trigger an unrelated command in another app.
- Pause/Resume Recording
- Set a separate shortcut for a temporary break. Pause is different from finishing the recording.
Confirm these settings before the full session. Changing the output format does not add detail that was missing from the source; choose a format that suits the way you will use the recording.
3Record a short test, then capture the session
Select REC or Record Now to begin. Check the elapsed timer, pause and resume when needed, and select Stop to finish the recording. Keep the Mac awake and the audio source available.
The menu beside REC contains Record Now, Countdown Record, and Auto-Stop Record. Use Record Now for the first test. See the automatic recording controls below when you need a delayed start or a defined ending.
Record a brief sample with the sounds you expect in the final result. For System&Mic, play the source and speak during the same test. After stopping, listen to the saved result before starting the full session.
The timer confirms that a session is running, but it does not prove that every intended source is audible. Avoid switching the input or output device while capturing, and keep the source application playing.
4Play the saved file and verify the result
Open File list, select the completed recording, and use Play to listen. Confirm the duration and sound, then use the folder control to find the saved file before recording the full session or sharing it.
The File list shows Name, Duration, Size, and Date & Time. Select a row and use the playback or folder control at the bottom to review or locate the recording.
- Expected sound
- Listen for Mac playback, your microphone, or both according to the chosen source.
- Level and clarity
- Check a quiet section and a louder passage. Listen for echo, clipping, or a voice that is hard to hear.
- Complete capture
- Check the beginning, middle, and end rather than only the first few seconds.
- File location
- Locate the saved file and confirm its format before sharing, editing, or moving it to an archive.
If the short sample is correct, return to REC and capture the full session with the same setup. Back up important recordings before deleting entries or changing the output folder.
Use countdown start, Auto Stop, and Auto Split
These controls solve different timing problems. Decide whether you need to delay the start, finish capture automatically, or continue into smaller files.
Countdown Record: begin after a delay
Open the menu beside REC and choose Countdown Record. Set the offered delay and have the source ready before it finishes. A countdown delays the start; it is not the same as selecting a calendar date or a recurring schedule.
Auto Stop: finish after a duration or file-size limit
Choose Auto-Stop Record from the REC menu and enable Stop recording automatically. Select the Recording duration in seconds or the File size limit in MB, review Recording Complete, and choose Only this time or Always before selecting OK.
Choose Do Nothing when you do not need another action after recording. Review the completion setting before leaving a session unattended. If Always was used previously, check that the old duration or size limit still suits the new job.
Auto Split: continue capture in another file
Open Auto Split from the main panel and enable Auto split the recording file. Choose a recording-time limit in seconds or a file-size limit in MB. Select Only this time or Always, then confirm with OK.
Keep the Mac awake and connected to power when appropriate. Countdown and automatic controls do not replace the source playing at the right time, and you should not assume they will wake a sleeping Mac.
Fix missing sound, echo, or unexpected recording behavior
Make a short saved test after changing permissions, devices, or timing rules. This helps you identify the problem before repeating a long capture.
| Symptom | What to check |
|---|---|
| Mac playback is absent | Select System Audio or System&Mic, confirm the source app is playing, and review the requested screen/system-audio permission. |
| Your voice is absent | Select Microphone or System&Mic, check the input in macOS Sound settings, and enable microphone access for the recorder. |
| Echo or doubled playback | Use headphones to keep speaker output out of the microphone. Record another sample with the same devices you will use for the full session. |
| Capture ends too early | Review Auto Stop duration and file-size limits, including any rule saved with Always. Also check free disk space and whether the Mac went to sleep. |
| One session creates many files | Check Auto Split. Increase the selected threshold or disable splitting when one file is required. |
| The saved file is hard to find | Select it in File list and use the folder control. Compare the location with Output in Settings. |
| A keyboard shortcut does not work | Check the saved Start/Stop and Pause/Resume combinations in Settings. Resolve conflicts with another app, then test the visible controls and shortcuts separately. |
Audio Recorder for Mac FAQ
Can I record Mac system audio and microphone together?
Yes. Choose System&Mic from the source menu beside REC. This captures Mac playback and microphone input in the same session. Use headphones, speak while playing a short sample, then listen to the saved file to check both sources.
Why is system audio missing from the recording?
Choose System Audio or System&Mic, confirm that the source application is playing, and review the requested recording access in macOS Privacy & Security. On current macOS versions, check Screen & System Audio Recording. Reopen the recorder if prompted and save another short test.
Why is my microphone silent?
Choose Microphone or System&Mic, confirm the intended input device in the Mac's Sound settings, and check Microphone access for GiliSoft Audio Recorder in Privacy & Security. Check the input level, reopen the app after a permission change, and record a spoken test.
How can I stop echo when recording computer audio and my voice?
Use headphones so the microphone does not pick up speaker playback a second time. Check that only the required input is active and avoid changing audio devices during capture. Listen to a saved test rather than relying only on the live display.
Which audio formats can I use, and where are recordings saved?
Choose MP3, M4A, or WAV in Settings under Audio format. Use Choose beside Output to set the save folder. After recording, select the result in File list and use the folder control to locate it; the list also shows its duration, size, and date and time.
What is the difference between Auto Stop and Auto Split?
Auto Stop ends the recording at a selected duration or file-size limit. Auto Split creates another file at a time or size threshold and continues capture. Both panels let you apply the rule with Only this time or Always, so review persistent rules before starting a new session.
How do I start a recording after a delay?
Open the menu beside REC and choose Countdown Record, then set the delay offered by the app. A countdown is a delayed start, not the same as choosing a calendar date or recurring schedule. Keep the Mac awake, the recorder open, and the source ready before the countdown finishes.
Can I control recording with keyboard shortcuts?
Yes. Settings includes separate Start/Stop Recording and Pause/Resume Recording shortcuts. Set combinations that do not conflict with your other apps, then test them in a short recording. The live panel also provides visible pause and stop buttons.
Is the Mac version free or included with the Windows license?
A macOS trial download is available. The Mac edition uses a separate $34.95 license and is not included with a Windows license. Use the macOS installer linked in this guide, not the Windows download.