
What Does Portrait Cleanup Software Do?
Portrait cleanup removes selected visual distractions while preserving the person, expression, skin texture, clothing, hair, and setting. It is different from rebuilding a low-resolution face or automatically changing someone's appearance.
Official retouching guidance from Adobe recommends matching the selection or brush size to the imperfection and using nearby texture, lighting, tone, and shading to blend a repair. The practical lesson is simple: a tight selection around one small distraction usually preserves more original portrait detail than painting over a broad part of the face.
Choose the Right GiliSoft Tool for the Portrait Problem
MarkEase is the focused cleanup option. Other GiliSoft tools solve different portrait problems and should not be described as the same feature.
| Portrait problem | Best starting point | Why |
|---|---|---|
| Small temporary blemish, spot, or stray hair | GiliSoft MarkEase Remove | A tight selection can reconstruct the small area from surrounding texture |
| Background person, sign, cable, or distraction | GiliSoft MarkEase Remove | Brush or outline only the unwanted background object and review the fill |
| Small or degraded face needs enlargement | GiliSoft Image Editor Face Repair | Face Repair combines enlargement settings with optional face restoration |
| Portrait is dark, dull, hazy, or noisy | GiliSoft Image Editor enhancement | Light, color, tone, defogging, and noise tools affect the full image |
| Face must be replaced for a creative effect | GiliSoft Face Swap | Face Swap changes identity and is not a cleanup or repair tool |
What to Clean and What to Preserve
Temporary blemishes and spots
Use a selection only slightly larger than the visible pimple, dust spot, or temporary mark. Preserve pores and nearby tonal variation.
Stray hairs
Remove isolated strands crossing a clear cheek, forehead, clothing area, or background. Dense hairlines and curls require much more caution.
Clothing lint and small distractions
Clean a thread, lint spot, minor stain, or distracting object when surrounding fabric texture offers a usable repair basis.
Portrait-background clutter
Remove an authorized background person, sign, cable, bin, or small object when the scene behind it can be reconstructed convincingly.
Sensor dust and scan marks
Clean dust that appears over skin or background without treating natural freckles, texture, or film grain as damage.
Permanent features
Preserve moles, scars, wrinkles, lines, freckles, birthmarks, and identity-related details unless the subject specifically requests a change.
| Selection area | Why it is difficult | Safer approach |
|---|---|---|
| Flat cheek or forehead | Skin has subtle pores, light gradients, and color variation | Use one small selection and compare texture at 100 percent |
| Eye, eyebrow, lip, or nostril edge | Small geometry changes alter expression and identity | Avoid broad fills; keep the selection away from the feature boundary |
| Hairline or beard | Directional strands are easy to repeat, smear, or erase | Work in short sections and reject repeated or soft patches |
| Patterned clothing | Fabric weave, stripes, logos, and seams must continue correctly | Use Edge Filling or Texture Repair only after a small test |
| Busy background | Architecture, railings, crowds, and perspective are hard to infer | Split a large object into smaller reviewed sections or keep it |
How to Clean Up a Portrait with GiliSoft MarkEase
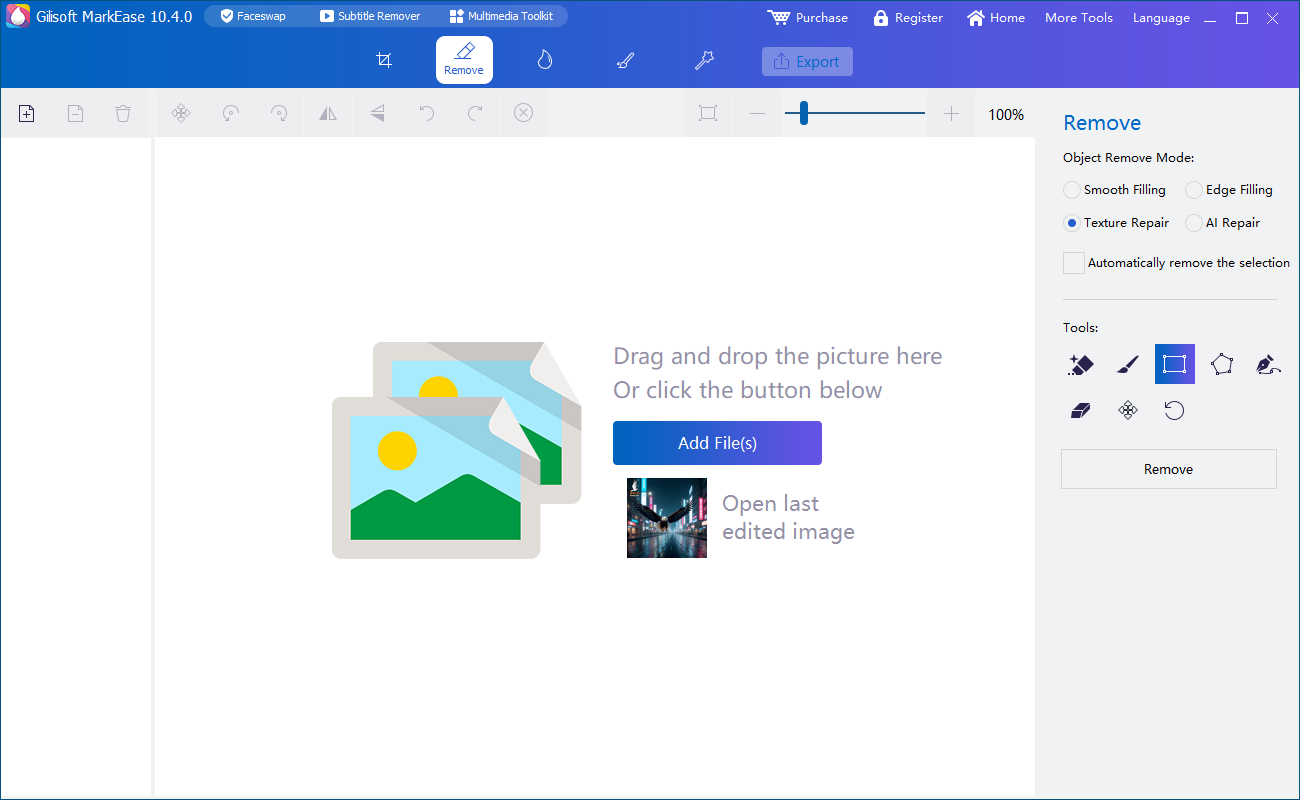
The steps below follow controls visible in the current MarkEase Remove workspace.
- Keep the original portraitUse a separate working copy of the highest-quality authorized photo. Do not start from a screenshot if the camera or scan file exists.
- Add the portrait to MarkEaseOpen GiliSoft MarkEase, add the image, and select the Remove workspace.
- Zoom into one distractionBegin with one small temporary blemish, stray hair, clothing mark, or background object.
- Choose a close selection toolUse the brush, rectangle, polygon, freehand, or other visible selection option that follows the unwanted area without covering nearby features.
- Select a repair modeCompare Smooth Filling, Edge Filling, Texture Repair, or AI Repair according to the surrounding skin, hair, fabric, or background.
- Run Remove and inspectCheck the reconstructed patch at 100 percent. Undo and tighten the selection when it looks blurred, repeated, discolored, or geometrically wrong.
- Clean separate areas one at a timeReview each change before selecting another distraction instead of processing a large part of the portrait in one pass.
- Export a new fileOpen the finished image outside MarkEase and compare it with the original at full size and normal viewing size.
Test portrait cleanup on one small area
Download GiliSoft MarkEase, select one temporary blemish or authorized distraction, and approve skin texture and edge quality before continuing.
How to Choose a MarkEase Repair Mode
The interface exposes four modes. Their exact result depends on the selected area and surrounding image, so compare them on a duplicate rather than assigning one mode to every portrait.
Smooth Filling
Test on low-detail tonal areas where a smooth transition matters. On skin, inspect for a flat patch that removes natural pores or shading.
Edge Filling
Test near a clear boundary such as clothing, wall, or object edge. Verify that the line continues in the correct direction.
Texture Repair
Test where nearby texture should continue into the selected area. Watch for repeated skin, fabric, stone, or foliage patterns.
AI Repair
Test on a duplicate when the area is more complex. Treat newly reconstructed content as an estimate and inspect facial and background details closely.
How to Keep Portrait Cleanup Natural
Reject these cleanup artifacts
- Blurred patch: the repaired area is smoother than nearby skin or fabric.
- Repeated texture: identical pores, hair strands, bricks, or leaves appear more than once.
- Color seam: the patch has a different skin tone, brightness, or white balance.
- Broken feature edge: an eyebrow, lip, nose, hairline, glasses frame, or clothing seam changes shape.
- Plastic skin: broad cleanup removes natural texture, lines, and facial depth.
- Background geometry error: railings, paving, buildings, or shadows bend or stop unexpectedly.
Do not retouch every visible mark
Natural portraits contain asymmetry, texture, smile lines, freckles, pores, shadows, and age. Cleanup should support the intended photo, not erase the subject's individuality or create an unattainable standard of appearance.
Remove Portrait Background Distractions Carefully
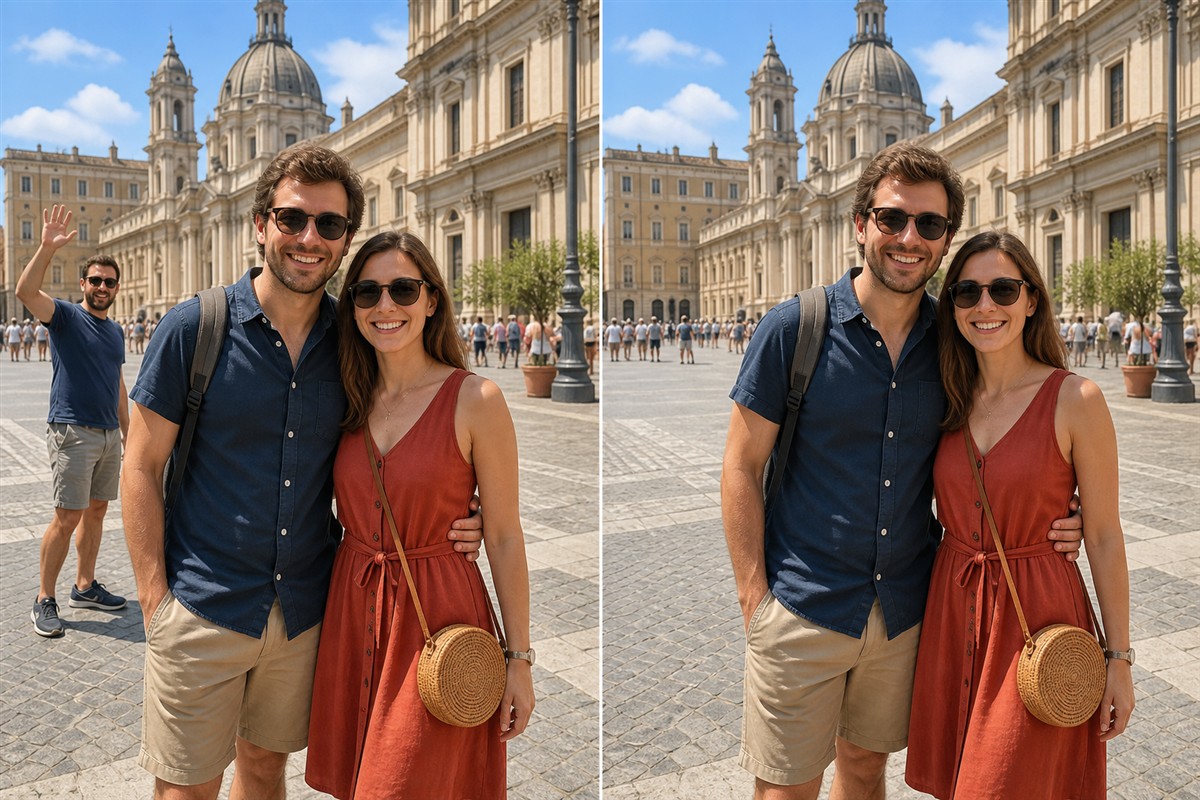
A photobomber or unwanted object can be larger than a skin blemish and may cross perspective lines, shadows, architecture, or other people. The surrounding scene must provide enough information for reconstruction.
Consent, Privacy, and Accurate Portrait Use
Use portrait cleanup only on photos you own or are authorized to edit. Obtain consent when edits change a recognizable person's permanent features, body, age cues, medical appearance, cultural characteristics, or professional presentation.
For journalism, identification, legal evidence, medical documentation, employment records, school records, or historical archives, keep the original and label any cleaned derivative. Do not remove people, marks, injuries, environmental conditions, or other information viewers reasonably expect the image to document.
MarkEase performs the core cleanup workflow in the Windows application. As the product page notes, separately described AI features may have different processing or connectivity requirements, so check the specific function before using confidential portraits.
Research Sources
The selection, texture, and natural-retouching guidance above draws on official documentation for healing and object-removal workflows.
- Adobe Lightroom Heal tool - repairing blemishes and distractions while matching texture, color, and tone.
- Adobe Photoshop Spot Healing Brush - matching brush size to small flaws and preserving surrounding detail.
- Adobe Photoshop Remove tool - brushing or outlining unwanted areas and using multiple strokes for complex objects.
- Adobe Lightroom: Replace areas with Heal - maintaining natural texture and lighting during small repairs.
Portrait Cleanup Software FAQ
What portrait cleanup can GiliSoft MarkEase perform?
MarkEase can use focused removal selections and repair modes to clean small temporary blemishes, stray hairs, spots, and authorized portrait-background distractions.
Is portrait cleanup the same as Face Repair?
No. Portrait cleanup removes selected visible distractions. GiliSoft Image Editor Face Repair is a separate enlargement and face-restoration workflow for small or degraded faces.
Why does a cleaned skin area look blurred or repeated?
The selection may be too large or the chosen fill may not match nearby texture. Undo, tighten the selection, and test a different repair mode.
Should permanent facial features be removed?
Only with the subject's authorization and a clear purpose. Moles, scars, lines, and other identity-related features should not be removed automatically or presented misleadingly.
Should the original portrait be overwritten?
No. Keep the original and export the cleaned portrait as a separate file.


