Clean watermarks, logos, text, subtitles, and unwanted objects from photos and videos. Refine the selected area and add fresh branding in one Windows application.
Clean photo watermarks with precise selection tools
Choose quick or AI video cleanup for the visible mark
Process image sets and add new text or image branding
Choose a task for a photo, fixed video overlay, subtitle band, text region, or irregular mark. Start with the complete cleanup workflow, or jump to selection tools, timing, batch images, AI points, and adding new video branding.
Follow these four steps for the complete job, then use the separate tutorials for the matching image editor, Quick Video editor, or AI video workspace.
1Choose the source and cleanup task
Keep the original image or video and open the task that matches the visible mark. Use manual image removal for a photo, Quick Video Watermark Removal for a fixed timed treatment, or the AI video workspace for Subtitle Removal, Text Removal, or Freehand Eraser.
Cover the complete watermark, text, subtitle region, or object without selecting unnecessary surrounding detail. Correct excess selection with the relevant Eraser tool. In the Quick Video editor, set Start and End for the interval where the mark should be treated.
For an image, use the Remove control belonging to the selected image task. For Quick Video, compare Delogo, Mosaic, or Gaussian Blur and the available Level. For AI video, review each loaded task and its point requirement before starting the offered Export workflow.
Use the selected workspace's save or Export workflow to create a new output without replacing the original. Inspect an image at full size, or play the affected video scenes and their boundaries in a normal player. Check picture, sound, duration, and the output you actually saved.
Use the best source available and retain an untouched copy. Decide whether the unwanted element is embedded in a photo, a fixed video overlay, changing subtitles, or an irregular region.
Inspect the surrounding content
Check nearby text, product outlines, faces, textures, and motion. Pick a representative image or short video section for the first test rather than processing the full collection immediately.
Choose a separate output destination
Keep edited copies apart from the source and check that the intended image viewer, video player, or publishing destination can use the output. Review the selected tool's processing requirements before a long AI video job.
Choose the Matching Cleanup Tool
Choose image or video first
For still images, use the image watermark or eraser workspace. For video, open Video and choose Quick Video Watermark Removal, AI Video Watermark Removal, or Add Watermark to Video according to the job.
Match the visible mark to the controls
Use quick regional treatment for a stationary timed overlay. In AI video, choose Subtitle Removal for caption regions, Text Removal for text areas, or Freehand Eraser for an irregular selection.
Review the chosen workspace before processing
Load the source and confirm the mode, region, and any relevant timing. Quick Video exposes Start, End, and treatment controls; AI video has its own task list, points, and Export workflow.
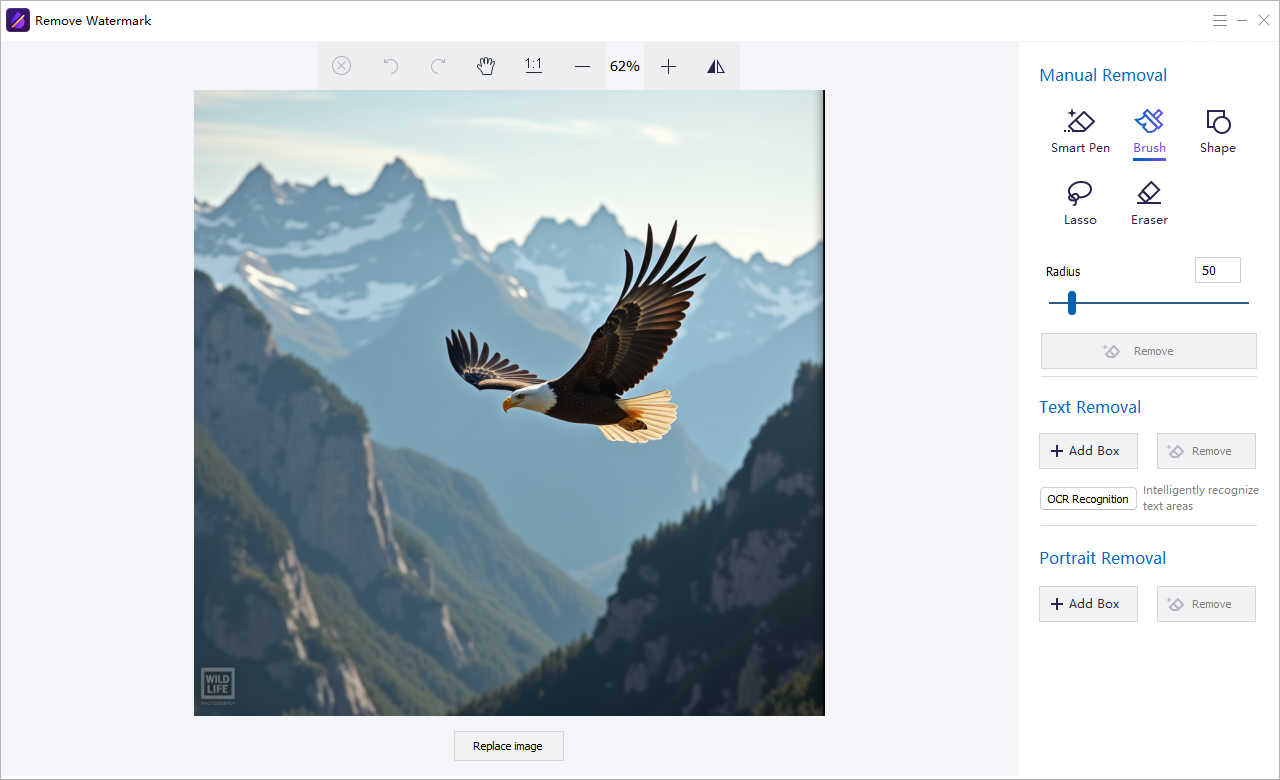
Choose the image watermark removal workspace and select the source image. Keep the original available; Replace image changes the active picture when you need another source.
Mark the unwanted area closely
Choose Smart Pen, Brush, Shape, or Lasso. Adjust Radius where relevant and cover the complete mark, including its visible shadow or outline. Use Eraser to correct excess selection.
Remove and inspect the repaired area
Use the Remove control for the manual selection. Inspect at 1:1, undo a weak result, and refine the region if necessary. Complete the image task's save workflow to a new copy and verify it outside the software.
The image workspace has separate Manual Removal, Text Removal, and Portrait Removal controls. Keep the selection close to the content being cleaned.
Select Image Text with OCR or Add Box
Choose the Text Removal controls in the image workspace
Use Add Box to identify a visible text region, or select OCR Recognition to locate text areas in the image.
Review the proposed regions
Check that the text, outline, or shadow is included without unnecessarily covering nearby detail. Correct the proposed boxes or use a more focused manual selection when needed.
Remove the selected visible text and save a copy
Use the Remove control in the Text Removal section, review the repaired picture, and complete the image save workflow. OCR recognition here helps locate text; it is not a promise to export an editable transcript or recreate the hidden original pixels.
The Text Removal Add Box, Remove, and OCR Recognition controls appear in the image workspace screenshot.
Remove a Portrait Region from an Image
Open Portrait Removal for the intended region
In the image workspace, find Portrait Removal and select its Add Box control.
Place and review the box
Cover the intended portrait region without unnecessarily including other required subjects or objects. Inspect the nearby background before choosing to reconstruct a large area.
Run that section's Remove control and inspect
Use Remove in Portrait Removal, inspect the reconstructed region at full size, and undo or refine a weak result. Save a separate output and check it in an image viewer.
Quick Video Treatment and Timing
Clean a Fixed Video Overlay
Load the clip in Quick Video Watermark Removal
Open Video > Quick Video Watermark Removal and use Add File. Open the editor's Watermark tab.
Add the regional treatment
Select Watermark Remover, move to a frame showing the complete overlay, and place the region around it. Keep the rectangle focused on the visible mark.
Choose treatment, timing, and Export
Compare Delogo, Mosaic, or Gaussian Blur, set the intended display interval, and review the region through the affected scenes. Select Export and check the saved clip in a normal player.
Quick Video has its own Watermark tab and timing controls, separate from the AI video queue. Review the treatment on the actual mark and background.
Set Quick Video Treatment and Timing
Select the treatment entry in the editor
In Watermark, select the intended Watermark Remover entry so you are editing the correct region.
Set the active interval and treatment
Under Time Range of Display, set Start and End to the relevant interval. Compare the Type choices and adjust Level where available.
Review the beginning, middle, and end
Play before the interval, through motion and scene changes, and after the interval. Confirm the treatment does not continue where it is not needed, then export and check the saved video.
Mosaic and Gaussian Blur visibly obscure the selected area. They are not the same as reconstructing the scene behind a logo. Compare Delogo or the appropriate AI task when a different result is required.
AI Video Subtitle, Text, and Freehand Cleanup
Open AI Video Watermark Removal from Video. This workspace has its own Add Videos, Eraser Mode, task queue, Remaining Points, and Export controls. Review the loaded task's settings instead of assuming it uses the Quick Video editor's Start and End fields.
Remove Burned-In Subtitle Regions
Choose Subtitle Removal and load the video
Select Subtitle Removal under Eraser Mode and use Add Videos, or drag a clip into the import area.
Review the caption layout and region
Use the displayed Vertical or Horizontal layout choices that match the caption area. In the loaded task, review the complete subtitle region, including long lines, outlines, and shadows, and check positions through scene changes.
Review points, process, and inspect the output
Check the task and processing requirement before using the offered Export workflow. Inspect the saved clip through several captioned scenes and their boundaries, not just one still frame.
This is the import workspace with Subtitle Removal selected. The displayed task count and point balance are examples, not a completed job or an allowance for your account.
Remove a Video Text Region
Choose Text Removal and Add Videos
In the AI workspace, select Text Removal and load the source through Add Videos or drag and drop.
Review the intended text region
In the loaded task, identify the label, title, timestamp, or text area to clean. Include its complete visible border and shadow while keeping unrelated picture detail outside the region.
Check the task and exported video
Review the selection through changing backgrounds and motion, confirm the processing requirement, and use the offered Export workflow. Reopen the saved clip and inspect the text area through its visible duration.
Text Removal is a separate Eraser Mode. Load the clip and review its own region and processing settings before starting.
Select an Irregular Video Mark
Select Freehand Eraser and load the clip
Choose Freehand Eraser in the AI workspace, then use Add Videos to load the video.
Trace and refine the irregular region
Choose Smart Pen or Brush Pen and adjust Size to suit the outline. Use Eraser to correct parts extending beyond the intended area.
Review the selection through motion before processing
Check the region across affected scenes and review the task's point requirement. Use the offered Export workflow and inspect the saved clip. A painted outline is not a promise of automatic tracking when a mark changes position.
Use the brush controls for the intended outline and review the region as the content changes. The screenshot shows the import state, before a clip has been added.
Image Batches, AI Tasks, Points, and Saved Results
Process a Set of Images
Open the dedicated image batch task
Choose Picture > Batch Watermark Removal for repeated image work and load the images through that task's workspace.
Test the selection on representative sources
Group similar dimensions and mark positions, but review each image's background and selection. A region that fits one source should not be assumed to fit every photo.
Process and inspect separate outputs
Use the batch task's output controls, retain the originals, and open representative saved files. Check names, dimensions, repaired detail, and sources whose stamp position or composition differs.
The Picture tools screenshot shows separate Batch Watermark Removal and Batch Watermark Addition entries.
Review AI Video Tasks Before Export
Add the intended clips
Use Add Videos in the AI workspace and review the current task list so the correct sources are included.
Review each task's mode and settings
Check the intended Subtitle Removal, Text Removal, or Freehand Eraser setup and the relevant region for each clip. Do not assume one selection or timing rule has been copied correctly across every task.
Review processing requirements before Export
Check the current point balance and the requirement for the loaded jobs, then use the offered Export workflow. Verify the saved file for each clip instead of treating a queue entry as a finished output.
Check Desktop Licensing and AI Points
Choose the intended desktop license
The Buy Now link in this guide leads to the $79.95 Lifetime / 1 PC desktop offer. A trial download is available for evaluating the application.
Review AI video processing separately
AI video jobs use separate points. Check Remaining Points and the selected job's requirement in the application before processing; the desktop license is not an unlimited AI-video allowance.
Use the current account and in-app purchase information
Review the offered point-purchase controls if more processing points are needed. Screenshot balances and queue counts are examples, not current prices or a free allowance. Retain the intended source and verify the output after processing.
Refine a Patch or Leftover Mark
Inspect the complete mark and its surroundings
For an image, inspect at full size. For video, review representative frames, including entry, exit, movement, and scene changes.
Correct the region or treatment
Include leftover shadows or borders, but avoid unnecessary background. Trim an oversized mask with the relevant Eraser tool and compare an appropriate treatment or a smaller section where useful.
Run a focused test and verify again
Use a representative image or short clip section before a long export. Check for remaining fragments, blur, repeated texture, color changes, or damage to nearby subjects in the actual saved output.
Export and Verify the Finished Media
Review the selected workspace's output setup
Use the save or Export workflow provided by that image or video task. Choose a new filename or destination and retain the original; image tools and video editors do not necessarily share the same output dialog.
Open the actual saved file
Inspect an image at full size or play the video in a normal media player. Check repaired detail, dimensions, orientation, format, and the output file you actually selected.
Verify the complete affected interval
For video, review frames before, during, and after the cleanup or new watermark, including motion and scene changes. Check audio and duration too. Keep the source and saved result until the complete job has been verified.
Add New Text, Picture, or Video Watermarks
Add a Text Watermark to Video
Open Add Watermark to Video and load the clip
Choose Video > Add Watermark to Video and use Add File. Open the Watermark tab.
Add the text entry
Select Text and enter the wording through the displayed controls. Review the text's position on the actual video preview.
Review timing and appearance, then Export
Select the watermark entry, set its display interval, and use the relevant Font and Transparency controls. Export a new video and inspect the text over bright, dark, and moving scenes.
This example shows the branding workspace before an entry is selected. Controls apply to the active watermark entry and its type.
Add a Picture or Video Watermark
Load the destination video in the branding editor
Open Add Watermark to Video, use Add File, and select Watermark.
Choose Picture&Video
Select Picture&Video and choose the source mark through the displayed workflow. Review its position and visible size on the destination preview.
Check the entry's settings and export a copy
Select the intended watermark entry, review its display interval and the appearance controls available for that type, and select Export. Verify the saved video's mark, motion, and audio in a normal player.
Set New Watermark Timing and Appearance
Select the intended watermark entry
In Watermark, choose the text, picture, or video entry you want to adjust rather than another entry in the list.
Set Time Range of Display and relevant appearance controls
Review Start and End. Adjust Transparency and, for a text mark, Font and the offered styling. Recheck placement on the video itself.
Preview both interval boundaries
Play before the mark starts, while it is visible, and after it ends. Check readability and overlap with required picture detail, then export and verify the complete output.
Open the Related Media Tools
Choose the category for the next media task
Use Picture for image utilities, Video for video cleanup or branding, and Audio when the wider project needs an audio task.
Open the intended utility rather than reusing an unrelated editor
Picture includes AI Image Watermark Removal, Eraser pen, Add Watermark to Picture, Batch Watermark Removal, and Batch Watermark Addition. Video has separate AI, Quick Video, and Add Watermark tiles.
Follow the selected workspace and verify its output
Load the source in that utility, review its own settings and processing or activation requirements, and save a separate result. Audio entries such as voice cloning, text-to-audio, and speech-to-text are separate tasks, not image or video selection controls.
The Picture screen is a task launcher. Open the matching utility to load images and configure processing.AI cleanup, Quick Video treatment, and new video branding open different workspaces with different controls.
Watermark Cleanup Checks
What you notice
What to check
Part of a date, logo, or letter remains
Review the complete outline, shadow, and longest visible text. Extend only the region that missed the mark.
The repaired area looks soft or repeated
Tighten the region and compare an appropriate method on the same source. Review the saved result at full size.
The effect remains after a logo disappears
In Quick Video, check the selected entry's Start and End under Time Range of Display.
A mark moves outside the selected region
Review movement and scene changes. Do not assume an outline automatically tracks a moving overlay; use suitable sections or tasks when needed.
A mosaic or blurred patch is visible
These treatments obscure the region. Compare Delogo or an appropriate AI task when you need a different type of cleanup.
An AI job needs additional points
Review the job requirement and current balance. Desktop licensing and AI processing points are separate.
The saved video differs from the preview
Confirm the actual file, output settings, selected task, region, timing, audio, and duration in a normal player.
Watermark Remover FAQ
Can it clean both images and videos?
Yes. The application provides separate image and video tasks so the selection and preview controls can match the source media.
Which video cleanup mode should I choose?
Use quick removal for a fixed overlay, Subtitle Removal for a caption band, Text Removal for fixed labels, and freehand tools for irregular shapes.
Why does part of a watermark remain?
The selection may not include the complete border, shadow, or longest visible frame. Expand it slightly and preview another representative point.
Why does the cleaned area look patched?
The marked region may be too large or the background may change strongly. Tighten the region and test a shorter section with that motion.
Can I add a new watermark after cleanup?
Yes. The Add Watermark task supports text, picture, or video marks with timing and appearance controls.
How should I handle several files?
Use the available batch image task for repeated image work, and verify each video task's region and time range before export.
Does the desktop license include unlimited AI video processing?
No. The $79.95 offer linked in this guide is a Lifetime / 1 PC desktop license. AI video jobs use separate points. Review the requirement for the selected AI task and the in-app balance or purchase controls before processing a clip.
Are Mosaic and Gaussian Blur the same as reconstructing the background?
No. Mosaic and Gaussian Blur visibly obscure the selected region. AI-assisted removal aims to reconstruct a region, while Delogo is a different regional treatment. Compare the result on the actual background rather than assuming every option produces an invisible repair.
Should I use Subtitle Removal for a subtitle track I can turn off?
First check whether the player can disable a separate subtitle track. Subtitle Removal here is for captions burned into the video picture. Cleaning visible pixels is different from turning off or removing a selectable subtitle track.
Does a Freehand Eraser outline automatically track a moving mark?
Do not assume it does. Review the selection through the affected clip, including motion and scene changes. If the mark moves outside the region or the available controls do not cover the change, use an appropriate separate section or task and verify the result.
Do the displayed AI points or queue numbers describe my allowance?
No. The screenshots show example point balances and task counts. Check your current account and the loaded job's requirement in the application; a screenshot value is not a free allowance, a price quotation, or proof that a task has finished.
Related Watermark Cleanup Guides
Choose a focused tutorial for the medium and visible mark involved in the task.